Pages

Thursday, March 31, 2011

EOTD: Bright! (Sugarpill with Madd Style Cosmetics)

Today the warm weather got me all excited to do a bright eye. (Not that I don't usually do a bright eye, but still!) I primarily used Sugarpill (both pressed and loose), but I also used one Madd Style Cosmetics pigment to achieve this look:

(Click the photo for a larger version.)

Products used:
  • The All Natural Face Shadow Primer in "Buff"
  • Sugarpill Cosmetics Buttercupcake on 1st half of lid
  • Sugarpill Cosmetics Magentric on outer lid and blended inwards toward Buttercupcake. Also blended up into crease.
  • Sugarpill Cosmetics Tipsy applied to lower lash line
  • Madd Style Cosmetics Tweaker in duct and as brow highlight
  • Gabriel Color Mascara in "Black"
Usually I put on a base (NXY Eyeshadow Base in "White" is my go-to), but today I decided not to in order to better test out the All Natural Face primer and to see how well my makeup would stay without a base affecting the process. The results were quite good. I took these pictures over 8 hours after applying, though I did do a quick touch up before snapping the photo. The creasing was minimal, which is great! What was the best, however, was that my Sugarpill colours were bright as all hell even without the white base!! Win!!

Friday, March 25, 2011

Madd Style Cosmetics: Pluggin' a Giveaway!

Helllllllooooo! So guess what?! If you haven't tried Madd Style Cosmetics yet...then how dare you! :)

Just kidding. But if you want to because you just found out about them and haven't yet taken the plunge or you're just wanting to grow your collection, a friend of mine (and fellow Madd Style Cosmetics model), Tiffany, is doing a fun giveaway on her blog!

Check out the details by going here. You gotta act quick though--the giveaway concludes on March 31st!!!!!

EOTD: Sugarpill and Madd Style Cosmetics.

I decided to something a little crazy last night with my makeup. This is what I like to call my first attempt at an "avant garde" type look. :)


Products used:
  • Sobe Botanical's Primed and Proper as primer
  • NYX Eyeshadow Base in "White" for a base all over lid and up to crease/brow area
  • Sugarpill's Buttercupcake on inner lid
  • Sugarpill's Afterparty in outer lid (and blended into Buttercupcake to create that green colour you see in the middle of the lid)
  • Sugarpill's Weekender in outer crease
  • Sugarpill's Magentric in innner crease
  • Sugarpill's Tipsy on my lower lash line
  • Madd Style Cosmetic's Up in Smoke "White" as brow highlight
  • Madd Style Cosmetic's Cocoa Puff to darken my brow
  • Urban Decay's 24/7 Glide-on Eye Pencil in Zero for waterline/tightline
  • Gabriel Color Mascara in "Black"
  • Sherani Lashes (Style 111) on top
  • Ardell Accents (#301) on bottom (outer half) lashes
Fun, n'est pas?

:)

Monday, March 21, 2011

FOTD: A neutral eye and red lip, featuring Madd Style Cosmetics

Today I felt like dressing up all glamorous (at least on the face) for no particular reason. I had nowhere to be, nothin' to do, but that is no reason NOT to get all gussied up. (At least that is what I keep telling myself!)

This is what happens when I'm left to my own devices:


And a close up of the eyes:


Products used on the eyes:
  • The All Natural Face Eye Primer in "Buff"
  • NYX Eyeshadow Base in "White"
  • Madd Style Cosmetics Desert Punk on lid
  • Madd Style Cosmetics Dirty Beats in crease (and on lower lash line)
  • Gabriel Color Eyeshadow in Bone on brow bone/highlight area
  • Madd Style Cosmetics Up in Smoke "Black" (mixed with Make Up Forever Eye Seal) for liner.
  • Gabriel Colour Mascara in "Black"
  • Ardell "Accents" (half falsie) lashes in 301
Product on Face:
  • Gabriel Liquid Foundation in "Soft Beige"
  • Gabriel Pressed Powder in "Light Beige"

Products on lips:
  • Madd Style Cosmetics Lip Bomb in "Mario" as base
  • Madd Style Cosmetics Dark Crystal "Ruby" all over lip
  • Madd Style Cosmetics Uber Boss Lip Gloss in "Frankencake" on top

Check out Madd Style Cosmetics, if you haven't already!

The end!

Sunday, March 20, 2011

EOTD: Madd Style Cosmetic's Dark Crystal Collection's Citrine and Sapphire

Today I wanted to play with three of my new Dark Crystal colours from Madd Style Cosmetics. Citrine, Sapphire and Opal worked together to create this:


Products used:
  • The All Natural Face Shadow Primer in "Buff"
  • NYX Eyeshadow Base in "White"
  • Madd Style Cosmetics Dark Crystal "Citrine" on lid
  • Madd Style Cosmetics Up in Smoke "Black" to cut the crease
  • Madd Style Cosmetics Dark Crystal "Sapphire" on top of the black and blended out
  • Madd Style Cosmetics Dark Crystal "Opal" in ducts and as brow highlight
  • Gabriel Color Mascara in "Black"

I had planned to photograph this look for a tutorial, but I had some camera difficulties and had to abort the photographing process half-way through. Look out for a tutorial on this look in the nearish future though! :)

Monday, March 14, 2011

EOTD: Sugarpill's Lumi, Afterparty and Weekender.

Today felt like a Sugarpill kind of day.

(Click pictures for larger versions.)

Products Used:
  • Sobe Botanical's Primed and Proper as primer
  • NYX Eyeshadow Base in "White" for a base
  • Sugarpill's Lumi on inner 1st 1/2 of lid + duct
  • Sugarpill's Afterparty on 2nd 1/2 of lid + lower lid + lightly into crease
  • Sugarpill's Weekender on outer eye and crease + outer corner of lower lid
  • Sugarpill's Lumi as brow highlight
  • Gabriel Color Mascara in Black
Close up (without flash):


Close up (with flash):

Sunday, March 13, 2011

Madd Style Cosmetics: The brushes I love and the ones I wish I didn't own!

I have a love/hate relationship with brushes. I LOVE to find new brushes and I love the ones that I use all of the time. I HATE that I *always* seem to find MORE brushes that I'm convinced that I need to try--even though I'm fairly certain that I don't actually need any more brushes (or at least not that many more). I also hate that I have some brushes that I'm fairly sure I will never use--wasting money makes me sad (as I'm sure it makes you sad too!). So, for this month's "tips" blog, I wanted to share with you all my brush successes and failures!


(Click on any picture to see a larger version!)

The brushes that I have that I use all of the time are specifically the ones that work well with my plethora of Madd Style Cosmetics pigments. All of the brushes I will be highlighting are also vegan brushes--as I only use vegan brushes (because...you know, I'm vegan and all. :)). If you know of any awesome synthetic bristled brushes that you think I'm missing from my collection, please let me know! At the end of the blog I'll post some links to some pages that I am stalking in preparation for a brush buying frenzy--but otherwise, I'd love to hear your suggestions!

To start out.

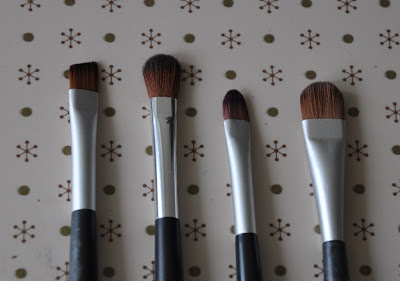
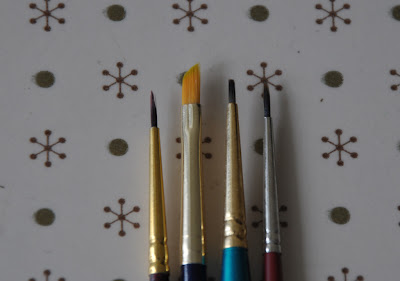
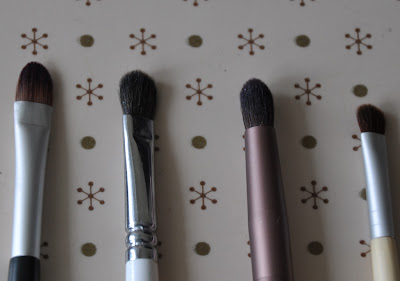
Back in the 8th grade (a long long time ago)--my Mom took me to The Body Shop for a make-over. I am fairly certain that I have had three of these four brushes since then! The first (Slanted Brush), third (Eyeshadow Brush) and fourth (Eyeshadow Blender) brush are all ones that I've had for a lonnnnng time. The second brush (Mineral Brush) is one that I recently acquired because I realized that it was one that I didn't have, and I liked my other three so much that I figured I'd pick it up!


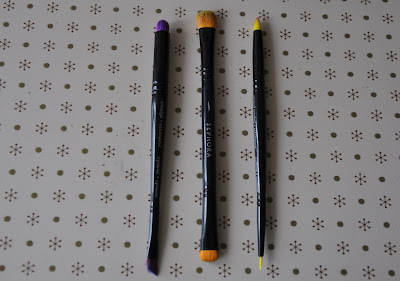
When I started really getting into mineral makeup in this last year, I started going to Sephora to check out their brushes. I now have all three of their double-ended brushes (they now have some crazy pink one, but it's a face brush and I have no use for that!) and I like all three, but mostly I only use one of the ends of each! Actually--that's not really true. I suppose that I use both ends of the purple and orange ones. But I never use the thin side of the yellow one.


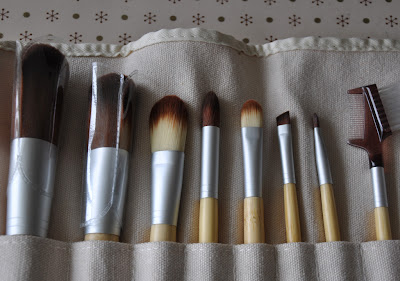
Once I realized how fun brushes were, I figured I should buy a set to get everything that I would need! I bought this set from Orglamix--I believe that it is like a generic ecotools set (the handles of the brushes aren't labeled as ecotools). I wish I hadn't purchased this set!! I don't use the face brushes (because I never wear blush or foundation or any of that "face" stuff). The tapered blending brush is MUCH too stiff. The eyeshadow brush is okay, in a pinch. The angled liner brush I could use, but I wouldn't for liner because it's too thick at the end. The only brush I use ALL of the time from this set is the pencil brush. In hindsight, I should have just found a pencil brush on its own and purchased that!


At Christmas time, 
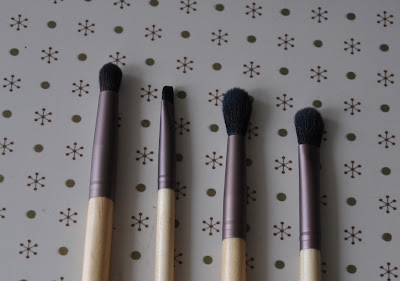
Alima had a sale one an a four piece "eye" set. I love love love these brushes. They are SOOOOOOO soooooooft. The brushes below are the #36 Pointed Crease Brush, #33 Angled Liner/Brow Brush, #37 Eye Blending Brush and #39 Large Shadow Brush. I use all of these, except for #33, pretty much all of the time. I highly recommend these brushes!


For eyeliner brushes, I ventured out to art supply stores. The great things about these is that they work great and are waaaaaaaaay cheaper than brushes you'll buy at makeup/department stores.


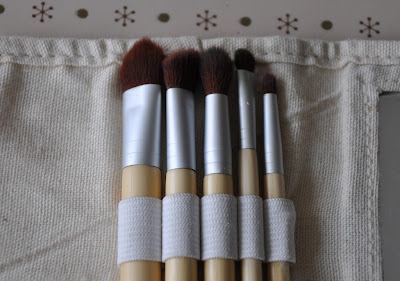
Then, one day I was in a drug store and almost lost my mind when I stumbled upon the mini Ecotools set! I didn't realize we sold them in Canada--but now that I have these ones, I see Ecotool brushes in A LOT more places! I use all of these brushes pretty frequently--the only one I rarely use is the largest one on the far left.


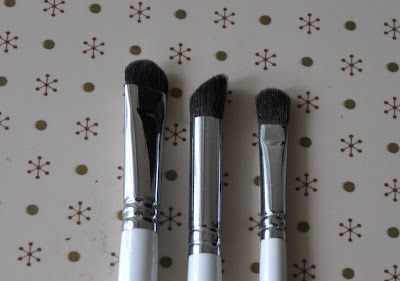
My most recent brush purchase was for these Obsessive Compulsive Cosmetics ones. I had been lusting after these ones for a while and recently found out about a 40% off sale and was able to jump on it!! The ones that I picked up: #006 Short Shader Brush, #005 Angled Blending Brush, and #008 Small Shader Brush. Like the Alima brushes, these are extremely soft. Sooo sooo soft. The 006 is MUCH bigger than I thought it was going to be. And the 005 is much more "blunt"--the angle is completely flat and round--not fluffy and tapered, like I thought the picture on the site looked. The 008 is the one I have been using the most and I like it very very much!


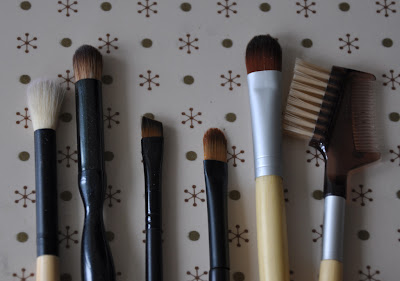
I also have some random assorted brushes. From left to right: ELF mineral blending brush, Sonia Kashuk domed crease brush, Sephora angled eyeliner brush, generic small eyeshadow brush (which I use to apply my NYX base, sometimes), Ecotools large eyeshadow brush and...I guess the last one is for brows and things? (Can you tell I never use it?!!)


Now--which ones I love the best and what I use them for!!

My favorite lid brushes. Body Shop Eyeshadow Brush, OCC Small Shader, Alima Pointed Crease Brush (which I use for my crease a lot of the times too!) and the the flat "wide" tiny brush from my mini Ecotools set. The first two are super great at packing on colour. I like the third a lot for blending above the lid towards the crease. And the teeny one is good for inner eye if I'm not wanting that colour on most of my lid.


My favorite crease brushes. The Alima Large Shadow Brush is similar to the orange Sephora brush (the fourth in this picture). It's a little fluffier so it's nice if I'm wanting more of a wash of colour. Next is the Alima Blending Brush (again, I like to use this for a less intense application and it's also great just for blending out the crease) and the Sonia Kashuk domed brush (great for packing on intense colour in the outer lid/crease). And last is the fluffy tapered brush from my mini Ecotools set (similar to the Alima Blender, just teeny tinier!!).

Edit: 9:48pm: Also, it should be mentioned that the fluffy brushes can be made to pick up a lot of product, if I do want them to. I guess that is part of what appeals to me about them--they're very versatile!!


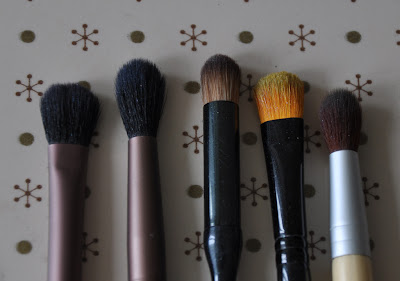
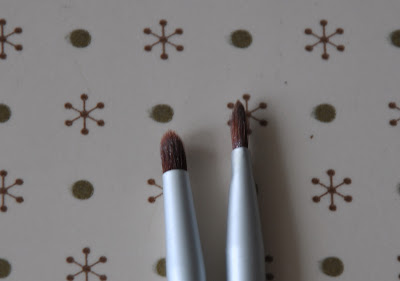
If I'm going for a more "sculpted" outside eye/crease, I like to use these two brushes. The Body Shop Slanted Brush is great because of it's size and I can place it on the outside corner of my eye (at the angle I want) and the colour is magically how I want it to be! The purple brush I use for smaller details on the outer eye, or sometimes for my lower lash line.


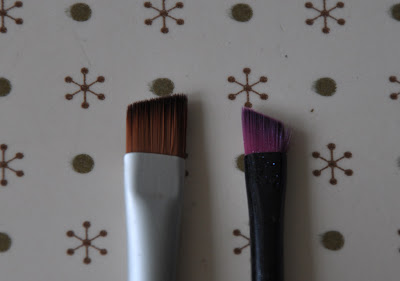
I also like to use both of these for my lower lash line. The Sephora Angled one is nice and thin--so I can keep things very close to the lashes. I also use that one to apply gel liner (which I am not too good at yet!). The yellow Sephora one is nice and stiff and it makes it easy to control the colour. I sometimes also use the yellow one for my duct colour.

Edit: 9:46pm: Oh! I also use the yellow brush to carve out a crease if I'm doing a cut-crease look!! I forgot about that!!


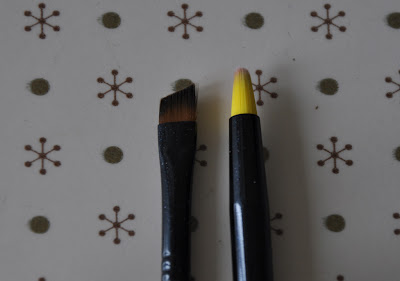
Speaking of ducts...these are the two I use for my ducts the most. The first is the tiniest one from my mini Ecotools set. It is nice and soft for that delicate duct area. The second is the ONE brush from that HUGE brush roll (that is otherwise pretty much a HUGE waste) that I actually use.


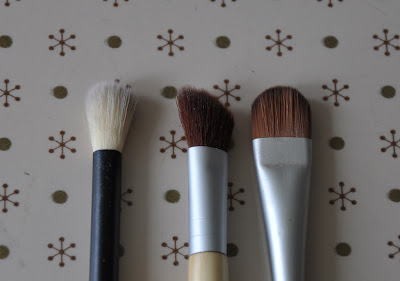
Then, for my brow highlight. I love to use the fluffy ELF brush the very most. It gives a very sheer coverage, which is great--because I don't usually like my brow bone to be BAM GLAM SPARKLE CITY (you know?!). The middle one is the fluffy angled one from my mini Ecotools set. It's pretty good at the sheer coverage thing too. And lastly, is the Body Shop "Blender" brush. I do not understand how this brush could be used for blending. But the tip of it is very flat (but rounded), so it's good for blending the brow colour down towards the crease.


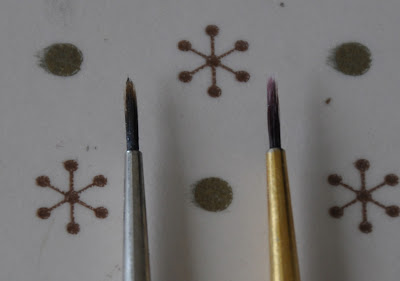
And for my eyeliner, I love my paint brushes the best! The one on the right is size 000 and the one on the left is just a 00. I bought the 00 one first to experiment with (and because when I first saw the 000s they seemed too flimsy to me) and it was so easy to use that I decided to pick up at 000 to see how that would be different. The 000 one makes such an amazingly thin line. It's wonderful!! I'm planning to do my eyeliner tutorial next month for my "tips" blog--so stay tuned for that!!!


So there you have it. Those are the ones that I use the most. There are a number of ones that I didn't list as my favorites--the two OCC ones (especially) I think will be more used as I get used to them, but I've only had them for about a month!! But as I said in the intro, I always have my eyes peeled for new brushes that I think look awesome! Cozzette brushes, for example, look NEAT. I really want to try the Cylinder Eye Contour and Mini Contour ones! These Nevy ones look ROCKIN'! And recently Inglot's 8OHP/S and 7FS/S have been added to my wish list!

Edit: 9:50pm: I also just remembered that I want two more OCC brushes too! The angled one AND the tapered blending one! Mayhaps I can pick them up when I go to IMATS in July!! Woo!

The moral of the story: brushes are neat. And if you have any synthetic recommendations, let me know!

Otherwise--go put on some makeup, I sure did!


Madd Style Cosmetics: Ripple (2/3rds of lid)>Pixie (1/3 of outer lid) with Glitter and Doom in crease and outer eye. Star Gazer as highlight and in ducts.

Thursday, March 10, 2011

Sugarpill: Review

Well. I have finally joined the club. Which club, you ask? The Sugarpill fan club, of course!! Yes, I know, it took me long enough--but I joined eventually, so give me a little bit of credit!

When I saw that Sugarpill was having a 1 year anniversary sale on the 14th of February, I could NOT be stopped from putting in my very first order. And since this was my very first order, I did not mess around. I wanted every vegan pressed shadow they offer and then I also wanted a range of the loose "ChromaLust" eyeshadows to try out. And let me tell you, Sugarpill lived up to my expectations.

Side Note: Amy, of Sugarpill, mentioned on their FB Fanpage the other day that Tako (their pressed "white") and Bulletproof (their pressed "black") will soon also be vegan, and I am overjoyed about that!!

Edit (03/23/2011): Tako is now listed as vegan on the Sugarpill website! Go buy it!! :D

I received my package as the sun was setting--so I apologize for the pictures not being as awesome as they could be--but once I get the flash involved, you'll be even more impressed, I promise!

As I was expecting, my package arrived in the adorable white box that everyone raves about. Include a kitty on things and I am pretty much sold!


The inside of the box was sooooooooo neatly packaged. I don't think my products budged an inch!


My invoice had a nice personalized thank you--an awesome touch.


The inside of the package was packaged as immaculately as the outside:


And there were a few extras hiding out underneath. A cute sparkly sticker, a neato business card and a sample of their ChromaLust loose eyeshadow in "Lumi."


To start out with, I ordered five ChromaLust loose eyeshadows. Magentric, Tipsy, Weekender, Darling and Goldilux (I purchased Goldilux for a friend, so it won't appear in my swatches or pot pictures--I didn't want to mess around with the pretty box!). First: the packaging. Adorable. I don't want to recycle them!! I loved that each pigment came in a box that had its ingredients listed on the backside.

(Yes, things got a little bit flipped around here! On the right side of the picture: clockwise from the top left: Magentric, Tipsy, Darling, Goldilux, Weekender. You can see I got them swapped around on the left side of the picture--whoops!!)

The tops of the jars have the Sugarpill logo on them. It isn't a sticker--the logo is printed on the lid itself. Very cool!


And inside the jars...wonderfulness.

(No flash: Magentric (t-l), Darling (t-r), Weekender (b-l) and Tipsy (b-r))

(With flash! Such an amazing magenta, teal, purple and green. Eeee!!)

How pretty are those?!! GAH! And swatched, over BARE skin (no primer, with flash):

(Darling, Tipsy, Magentric, Weekender)

These loose eyeshadows are seriously wonderful. They are sparkly, smooth and so CLINGY (in a good way!) to a brush. I'm all kinds of amazed by them.

Then on to the pressed. Again, with their freakin' adorable packaging!


The cases look like this:


And a close up of each:

Poison Plum: A red-based purple with a slight pearlyness/sparkle factor.

Buttercupcake: The perfect matte yellow.

Afterparty: A super blue with amazing shimmer.

Midori: A lovely green with sheen.

Swatched, the pressed shadows look like this (again, NO base or primer):


My fingers were very happy after all of this swatching, let me tell you.


I couldn't wait to start playing, either.

Buttercupcake>Magentric with Poison Plum on the outer corner.

Buttercupcake>Midori>Afterparty

Buttercupcake (do you see a pattern, cause I sure don't...)>Darling. Madd Style Cosmetics Up in Smoke "White" used as brow highlight and duct colour.

I will definitely be purchasing from Sugarpill again. The quality of the product is superb and worth every penny. I totally need the pressed white and black, once they are released as vegan. Oh, do I ever need them.

Sunday, March 6, 2011

Madd Style Cosmetics: Youtube dupage.

Recently I watched Jazziebabycakes's "To Infinity & Beyond" tutorial and wanted to see how I would fare duping it using all MSC products. I didn't do things exactly as she did, and in retrospect, there are a couple of things I should have tweaked a bit more while photographing the tutorial--but I still think the following pictutorial will give you a good idea how easy it is to adapt anything you see to an awesome look using Madd Style Cosmetics products. If you're curious to see what I got up to, read on. :)

To start out, these are the supplies I used:

(Gabriel Color Mascara in "Black"; NYX Eyeshadow Base in "White"; The All Natural Face Primer in "Buff"; Madd Style Cosmetics pigments in: (t) Up in Smoke "Black", (middle-l) Ecto Cooler, (bottom-l) Jubilee, (middle-r) Tweaker, (bottom-r) Electric Koolaid; Urban Decay 24/7 Glide on Eye Pencil in "Yeyo"; flat eyeshadow brush; domed crease brush; angled liner brush; pencil brush; fluffy brush; 00 sized paint brush; 000 sized paint brush.)

As always, you want to start by applying your primer and base. I rubbed my finger around in my All Natural Face primer and then applied it to my eyelid, all the way up to the brow. Next, for my base I applied NYX Eyeshadow base in the center of my lid and then blended it out on the whole lid and up towards my crease/brow bone.

(Funny story: here I thought I was going to be so clever and not photograph my priming/base steps, since my process is the same every time (depending on which products I use). These two pictures are from previous tutorials--and little did I think, they're the "wrong" eye for the rest of the tutorial!! So have yourselves a little laugh about that now and get it out of your system. :))

For this look, as Jazziebabycakes did in her tutorial, I foiled my lid colour. I could have applied Madd Style's Awesome Sauce to my lid and got a fairly similar effect, but I wanted to wet my brush with water, simply because I don't try out that application technique enough! All I did was stick my brush under the tap for a second--you don't want to have your brush soaking wet, but you want it thoroughly damp. Next, I dipped the brush into Ecto Cooler and then smooshed the colour into the bristles using the inside of the lid. I, then, applied this all over my lid.

(See how intense and awesome the colour turns out this way?!! GAH!)

Then, using the same brush, I blended out Ecto Cooler (not really by bringing the colour from my lid up, but by using the rest of the product that was on my brush and gently brushing it along the harsh line that you saw in the previous picture) towards my crease until I ended up with something like this:


To do the crease/outer lid part--I took Jubilee on a domed crease brush and applied it to the outside lid, gently blended it into the outer most Ecto Cooler, and then brought the colour up into my outer crease.


Now for the neato lower lash line stuff! Grab a white liner and line your lower lash. TRY not to get too much IN your lashes (seriously--I'm really bad at not doing it--and the UD stuff is sticky!)


Switching brushes, I used an angled liner brush and picked up some of the very awesome Electric Koolaid. I applied this all along my lash line, trying to keep the line as close to my lashes as possible.

(Side note: Electric Koolaid is soon to be discontinued as Mo's supplier will not longer carry some of its essential ingredients. Pick up this colour while you still can!!!)


To wing the purple out I placed a bit more Electric Koolaid on my brush and placed the brush on the outside of my eye, following the line/direction of my lower lashes.


For the tiny white line, I took a 00 sized paint brush with some NYX Eyeshadow Base on it and painted the line on just above where the Electric Koolaid was. Easy peasy!


Changing my brush (again!), I picked up my pencil brush, dipped it into Tweaker, swirled it around in the inside of the lid, and applied it to my ducts while gently blending it up towards the inner eye.

(Side note: Tweaker is currently discontinued. For a substitute, 3rd Wish could be used!!)


At this point, my lids looked something like this:


For my brow highlight, I used Tweaker again--but switched to a fluffier brush in order to get a nice subtle wash of Tweaker. I blended this colour down towards the inside of my eye and swirled it around on the seam between Ecto Cooler/Jubilee and the brow bone.


To finish it up, all you need to do is apply a black liner and some mascara! I used the Up in Smoke "Black" as a liner. I mixed it together with Aromaleigh's (the now defunct) Eyeliner Sealant. To guide the wing shape, I just put it right above the white and filled in the very obtuse triangle to meet the rest of the liner. (I will do a better/more indepth explanation of liner...soonish!)


And here is a photo with flash:


This was incredibly fun to put on and to wear! As I said in my "intro"--retrospectively, I wish I would have applied a bit more Jubilee--but I still liked the end result. :)

So see? Even though I didn't have ANY of the products that Jazziebabycakes used, I ended up with a look that is pretty close to what she had.

If there is anything you'd like to see me do next, or any colours you'd like to see me use, let me know! For my "tips" blog of the month, I plan to give you all a run down of my brush situation--the brushes I love, and the ones I wish I never bought!! So stay tuned for that.