Pages

Monday, January 31, 2011

Madd Style Cosmetics: Illuminati, all by herself.

Are you curious about how to get a multidimensional look using only ONE Madd Style Cosmetics pigment? Or are you not exactly sure how one goes about using different colour bases together? Well look no further! Read on to find out how to take your clean eyes to WOW eyes, using only MSC's Illumanti (+ a highlight colour!)!


The supplies you will need to accomplish this:

(Left to right: SoBe's Primed and Proper, NYX Eyeshadow Base in White, Urban Decay's 24/7 Glide-on Eye Pencil in Zero (black), MSC's Columbia (or any white MSC pigment you have), Illuminati (the start of the show!), a concealer brush/small stiff eyeshadow brush, a flat eyeshadow brush, a fluffy blending brush, a pencil brush/extra small eyeshadow brush, an extra fluffy brush, and mascara!)

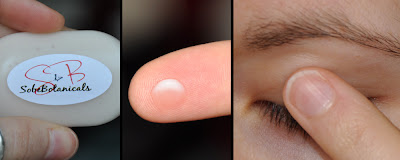
First you will want to prime your lids. You can use any kind of eyelid primer you want to, my product of choice right now is SoBe's Primed and Proper. I put a TINY amount on to an index finger, then I rub my two index fingers together and apply the product to both of my eyelids--all the way from the lid to the brow, to the inner eye/duct area and on my lower lash line.


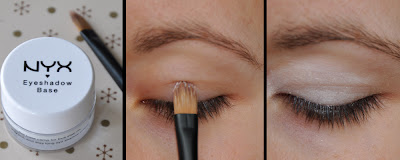
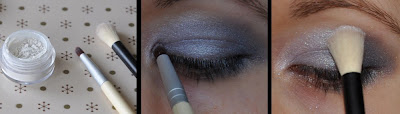
Next comes the white base. Using a small eyeshadow brush, I apply it in my ducts and on the inner 2/3rds of my eyelid. You can cover your whole eyelid with the white and then put the black over-top of the white--but why waste your precious white base if you don't have to?! If you have a different kind of white base, don't fret--any white base will do!


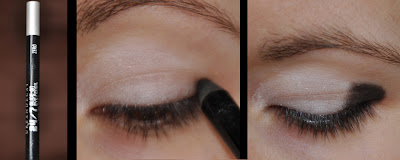
For the black base you want to take your eye pencil (or your black base of choice) and starting at the outer corner of your eyelid, fill in where your left off with the white. I also filled in the outer lower lash-line--about the outer 1/3rd.


Then you gotta get a little blendy! I use my finger--especially because the UD Pencils are quite firm and I don't think any of my brushes would be strong enough to move the product. I blended the black in towards the white on the lid and also up towards my outer crease and a bit towards the middle crease.

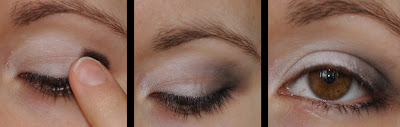
(As you can see in this picture--I got a little overzealous with my blendy blendyness. I think I applied a bit more of the NYX eyeshadow base to the lid to fix that.)

Now your lids are primed and your two-toned base is ready for whichever MSC pigment you want to feature. I tend to like to pick lighter colours when I do my white>black base in this style. I will do another pictutorial in the future showing a different variation on this and what effect you get by changing the placement of the white and black bases.

Dip your brush into your pigment and swirl it around on the inside of the lid to get the product evenly distributed through your bristles. Using this brush I applied Illuminati to the inner 2/3rd of my eyelid. Remember. PAT. Pat pat pat the pigment on.


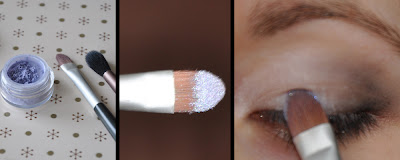
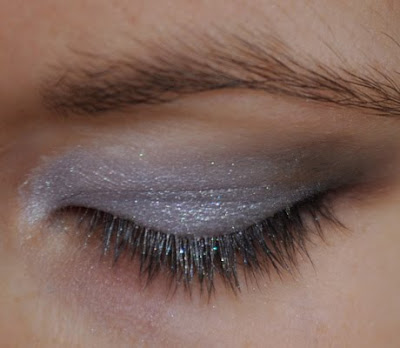
Once you're finish with the patting, it should look something like this:


Notice that I stayed away from the black? That was definitely on purpose. When I do one-colour-looks, I like to use different brushes in order to help give the single pigment even more dimension.

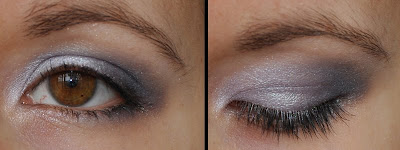
To do my crease colour I use a fluffy brush--this really brought out the glitter in Illuminati. I started with my fluffy brush in the outer corner of my eye and then rocked the pigment up in into the crease all the way into my inner eye (not the duct area though!). Using the same brush I also brought the pigment down on my lower lash-line.


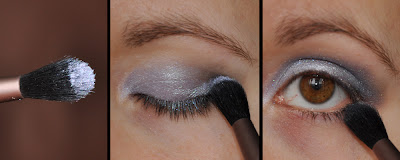
You could very well end the look here and be done! But I figured adding a duct highlight/brow highlight wouldn't be cheating. Using Columbia (from MSC's Rocky Horror Picture inspired collection) I highlighted my ducts with the tiny eyeshadow brush and my brow area with my fluffy fluffy blender brush.


Apply some mascara (as always-I use Gabriel's mascara in "Black"), and we're done!


I hope you found this tutorial helpful and that you feel like you're ready to try it on your own! If you have any questions or need further details on steps, leave me a comment. :)

Sunday, January 30, 2011

Attempt #2: SoBe Primed and Proper.

Due to the helpful email response from Lex (of SoBe Botanicals) after my first experience (chronicled here) using the Primed and Proper eyelid primer--yesterday I tried it again, but this time I used much less product.


After putting this on one finger, I just rubbed my two index fingers together and applied the product evenly on each eyelid (up to the brow) and down around the ducts and lower lash line. A little goes a LONG way, trust me!!

In order to get qualitative results I did two different eyes (one eye with MSC pigments and the other with the SoBe samples that I was sent with my order). Both had the same base (NYX eyeshadow base in White) applied over the primer and under the pigments. I photographed both eyes at three various times in the evening. I have to say, I am quite pleased with the results.

Using my two unnamed SoBe pigments:
(Edit (7:13pm): Lex let me know that the two pigments are "One of a Kind." She creates pigments (that aren't on the website) to send out in packages. Sometimes these are sneak peeks into new colours that will be posted on the site, and sometimes they're just a colour she mixed together. Neat!)

(What a terrible swatch picture. I have awful luck trying to get swatches to come out properly! I will practice with this!!)

I created this look:


I applied the light/soft pink to my lid (from the ducts all the way to the outside corner of my eyelid) with a flat eyeshadow brush. Then I applied the mauve colour in the crease/orbital bone with a fluffy blender brush. You can see that even after 7 hours--the product still looks pretty good! Yay for that!!

For the MSC eye, I did this:

I used Princess Buttah Cup in the inner eyelid (applied with a flat eyeshadow brush). Then Radar Love was applied with the same brush to the rest of the lid. I used a fluffy eyeshadow brush to apply She-Bop to the outer "V" area of my eye and pressed some Dazzle Dust on top of the She-Bop with the same fluffy eyeshadow brush. Mr. Roboto was used in the ducts and as a brow highlight (I think I used a pencil brush to apply to my ducts and fluffy blender brush to apply it to my brow). Glitter Bitches became my eyeliner (applied wet with my go-to eyeliner brush: a size 00 Galeria Winsor & Newton artist brush--then I used an angled eyeliner brush to press some dry pigment). Just like with the SoBe eye, my primer stood up to the 7 hours underneath my MSC piggies. Woo!!

I am BEYOND thrilled to have a found a product that works for me!!! For any vegans out there (or for anyone who prefers to keep animal products out of their cosmetics) curious about what to use, SoBe's Primed and Proper has my stamp of approval!!

Edit (05/21/2011): As I have said in the comments on this blog--I have NEVER been able to successfully recreate the results that I achieved during this test. -sigh- I don't know what it is. For a consistent product, Primed and Proper has not delivered (for me). If you know of any trips/tricks, I would LOVE to hear them. Today I played around with using it as a lip primer under some OCC Lip Tars--I'm not too sure how well it's worked, but the Lip Tar has stuck around pretty well so far!

Friday, January 28, 2011

Primerlessness ceases!

Today was a glorious day! I received my new vegan primer from SoBe Botanicals!

A bit of back story: I have been traumatized by companies messing up my order/not sending my orders out. The result of this trauma is paranoia about every package I ever order not getting to me. I have to say, Lex (of SoBe Botanicals) was wonderfully communicative throughout my waiting period. I had originally emailed her when I didn't receive a shipping notice. I was informed that the website automatically generates an email notice, even though international customers are exempt from actually being sent a tracking number or shipping notice. This is normal, and I'm used to it--but because of the auto-email, I was concerned. The day after emailing I heard back from Lex and she reassured me that my package was shipped in the 5th of January. By Wednesday the 26th when I had still not received my package, I emailed Lex again (see?! paranoid much?!!). She once again replied and said that harsh weather may have been the issue and she asked me that I let her know when my package did get to me. A+ for customer service, for sure! And then today I excitedly emailed her to announce that my package did make its way to me!

And here's the proof:
And the excitement doesn't end there. Upon opening the package I was confronted by this adorable packaging:
Gah!! Cute, no?!

And the insides:
Left to right: Primed and Proper, business card, two seemingly unlabeled pigment samples.

The primer, the pièce de résistance, was sealed. A nice reassurance that the product hasn't been compromised in any way,shape,or form.


And the product itself:


My first impressions of the product were very positive. I think that had a lot to do with the packaging and the way the product arrived and the communication I had received from Lex. The texture of the primer is very light and what you see in this picture was what I used for both of my eyelids. The scent of the product was nice: there was a freshness to it. When I put it on my eyelids it was a bit cool, which wasn't unpleasant. It was very smooth to apply--though I wasn't exactly sure how much to use!

Later impressions: I applied some MSC pigments over top of NYX eyeshadow base in white (all over top of the primer, of course!). The immediate results were awesome. The primer seemed to help my base stay in place, and applying pigment over top didn't give me any issues.

This is MSC's Nirvana (on the lid) with Sub Zero in ducts and as a brow highlight. Time Warp as a liner.

Even later impressions of SoBe's Primed and Proper: About an hour after application, my eyeshadow still looked great. But after two hours I definitely have creasing (more on one eye than the other, it seems). I'm not entirely discouraged by this because I wasn't exactly sure how much product to use. I will experiment using less first and then more after that.

Knowing 100% that this primer is vegan makes me very willing to try to make it work!

Edit: 11:14pm

When I received my package and let Lex know, I also told her I would be writing up a blog about it. She asked me to forward her the link and I did--also saying that she might be able to help me out with my amount of product issue. Lex let me know that she uses about half the amount I pictured for both eyes. So tomorrow I will try it again with way less product! And hooray for that--cause that means the 1/2 oz bottle will last me a long while!!

Thursday, January 20, 2011

Primerless.

I am still primerless. My Sobe Botanicals package with my (hopefully) new (favorite) primer has not arrived yet. It was shipped to me on the 5th and I keep hoping that maybe it'll just take two weeks to get to me--which means it could be here ANY TIME! But I keep checking my mailbox and getting all disappointed when I find it empty. One day, maybe one day, mail won't take three weeks to get to me from America. Maybe. One. Day.

Yesterday I had an un-fun day at work and decided to try to cheer myself up with colours. One of my friends suggested I try using chapstick as a primer, just for the time being. I tried it. It worked long enough for me to take some okay pictures, but the colours blended together and creased pretty severely shortly (within an hour, I would guess) after I applied it. Maybe next time I'll try less chapstick?

It really just all depends on how long my darn package takes to get to me!! Bah! And this also depends on me actually being happy with the results of the SoBe product! So many variables.

Here is a collage I made of the look I did yesterday (see xsparkage's tutorial on youtube for the method behind the madness).

As usual, the pigments I used were MSC. And I realized after struggling with photoshop in order to make that darn collage (all by myself, mind you!!) that I forgot my tear duct colour: Xray Spex.

Monday, January 17, 2011

Madd Style Cosmetics: Brad and Jubilee, sitting in a tree.

Okay, are you ready?!! Here it is, my first blog tutorial!!! *excited!!!*

Much to my disappointment, I realized AFTER taking all of the pictures that my camera's White Balance setting had been messed up by a friend who was over pressing all of the buttons. Here I thought I was just looking blue...because of the blue eyeshadow?! Regardless--if you want to find out how I achieve this:


(This picture shows colours truer to how they appear in real life.)

then please keep reading. And! ALL pictures can be enlarged by clicking on them, so if you want a bit more detail, you may be in luck! :)

First you will need to gather all of your supplies.
From left to right (and top to bottom) you see: NYX Eyeshadow base in White, a small eyeshadow brush, a medium sized flat/paddle style eyeshadow brush, a pointed crease brush, a fluffy blending brush, MSC: Love and Rockets, MSC: Jubilee, MSC: Columbia, MSC: Brad, and mascara.

You may be asking yourself: "Wait a second! What about primer? What kind of primer do you use?!" Well, dear readers, please see this post for an explanation on that. You should be using your primer of choice before you apply your eyeshadow base of choice. Primers help to keep your base and pigments in their place and they also help to stop any unsightly creasing. So lets all just pretend that I have applied a primer.

*inserts imaginary picture of primer being applied*

After your primer is applied, you can move on to your eyeshadow base. Eyeshadow bases help to give your pigment something to stick to--and white bases help to make your colours really POP. I like to use a small eyeshadow brush to apply my base, that way I get a nice even coverage and my fingers don't get all sticky!

I spread it around on my eyelid. Don't worry about it being too perfect, you'll be fixing that.

As you can see, I have just roughly placed it where I want it to be.

Once you have it mostly where you want it to be, you can blend it out with your finger, or your brush (as I did). I blended it up towards my crease/orbital bone, down by my inner eye/tear duct, and also down below my lower lash-line (about 1/3 of the way from the outside corner of my eye to the middle of my eye).

And now to get some brushes dirty!! This shows my process of dealing with loose pigments. Whichever brush I am using, I always dip it in the pigment and then swirl it around in the lid of the jar to pack it into the bristles--this also helps to get the pigment evenly distributed. Yay for "killing two birds with one stone" (vegans need some animal friendly sayings...obviously!). For my lid colours I almost *always* use my (Body Shop) paddle-style eyeshadow brush. The pigment shown here is MSC's Love and Rockets.

For loose pigments you want to make sure that you
pat the pigment on. Pat pat pat until you get the consistency and colour pay-off that you want. Patting is important because if you drag the pigment along or use a "swiping" motion two things will most likely happen: fall out (probably!) & loss of glitter (if you are using a glittery pigment). This issue is less of a concern if you are using a shimmery or satin colour, as I am here--but patting helps to really pack on the colour--which you definitely want!! Here I am applying Love and Rockets to the inner 1/3 of my eyelid--I also applied it to the inner eye by the tear ducts as well.

Using the same brush (and the same swirling technique I showed above), I am now applying MSC's Brad to the rest of my lid.
(This picture helps to show where I stopped applying Love and Rockets--see the line where Brad starts? Love and Rockets is on the other side!)

I like to blend my pigments together as I move from the inner to outer eyelid. To blend Love and Rockets with Brad, I use the same "pat" as I do to apply the pigment--I patted from Brad in toward the inner 1/3 of my lid. No extra product is needed on your brush, just pick up some of the eyelid colour you want to "move" and pat pat pat in the direction that you want to blend. (This isn't to say you can't add extra Brad to your brush before blending towards Love and Rocket, you totally can!)

Brush change, brush change! Using my (Alima) pointed crease brush, I dip into MSC's wonderful Jubilee and with the same swirling motion on the inside of the lid, I get the pigment nice and even on the bristles.

Starting at the outside corner of my eye (in between my eye ball and the socket) I use a windshield wiper motion to apply Jubilee up into my crease and all the way towards my inner eye (but not down all the way to the ducts!). While I putting Jubilee in the crease I also pat it towards Brad a tad, to help blend those two colours together. I also bring a bit of Jubilee down from my outer eyelid on to my lower lash-line. I only bring it as far as I placed the NYX eyeshadow base.
(My "true" crease is much lower than where you see my applying my colour--as I have semi-hooded eyelids, I like to pull my crease colour up higher so that when my eyes are open, my crease colour is visible.)

For my brow highlight colour, I change to my very fluffy (ELF) blender brush. I dip my brush into MSC's Columbia and use the same swirling motion on the inside of the lid. I concentrate the pigment below the arch of my eyebrow and sweep it along the whole brow-bone area. At the same time, I marry Jubilee with Columbia to help fade out Jubilee a bit. I also bring Columbia down towards my inner eye and dust it along by my tear duct.

A little bit of black mascara--I use Gabriel Color Mascara (it sure is hard to find a good vegan mascara! I have been using this brand for years now and I quite like it)--and you're done!

Thank you so much for taking the time to look at my tutorial. I hope you enjoyed it!! The colours I have used are suggestions only, so don't fret if you don't have Brad or Jubilee or any of the colours I have used--just replace them with an MSC lighter blue and an MSC darker blue and you'll be set! If there is an MSC colour you've been dying to see in action, leave me a comment and I'll try to work it into my next tutorial. :)

Remember to check out Madd Style's Etsy shop. Mo is going to be putting up some new colours soon--and you won't want to miss out on those!

Sunday, January 16, 2011

Where I lament about my lack of a primer.

Up until a few weeks ago (right after New Years Day, to be exact), my makeup wearing abilities were dramatically altered.

I had been a happy vegan customer of Urban Decay and faithfully used their Primer Potion for my eyeshadow primer as it was marked with Marley's purple paw--the symbol that UD uses as their "vegan" signifier. Sometime after December 31st I was browsing UD's website when much to my dismay, I came across this (click to enlarge):


Oooooh, I was sad. The non-vegan ingredient is a derivative of lanolin (the oil that comes from a sheep's wool). I was sad about this and also sad because I had stocked up on two whole bottles while on a recent trip down to the States because they are considerably cheaper south of the 49th parallel. -sigh-

I keep meaning to take a trip to my local Sephora to see if they still have the UDPP marked as vegan. They probably do, and that means that vegans who don't regularly check UD's website won't know about the announcement that was made in November about the un-veganess of that product.

Thus began my search for a NEW primer--and the search has been...relatively unfruitful. As of right now I have ALL of my "eggs" in one basket--SoBe Botanicals offers a vegan primer called Primed & Proper. I ordered it on January 2nd, it was shipped on January 5th, and I have yet to receive it. If this product doesn't stop my creasing, the only other option I know of is The All Natural Face's primer--but from the looks of their packaging, I'm *really* hoping that SoBe's primer doesn't let me down. Today I also got all excited after learning that Sugarpill will be coming out with their own primer--but then my excitement was extinguished when a friend of mine asked Amy (owner/creator of Sugarpill) if the product will be vegan. The answer is negative.

So my fingers are crossed very tightly for my SoBe primer. Oh, are they ever!

(PS: If any of my followers have any leads on any awesome vegan primers, I would *love love love* to hear about them!!!)

Friday, January 14, 2011

Madd Style Win: Thoughts on Vegan Stance and Packaging

As stated in my last blog--so begins my foray into the world of reviewing/tutorial making for a most wonderful cosmetic company, Madd Style Cosmetics (hereafter referred to as MSC).

MSC's slogan: 100% Vegan. 100% Worth it. And goodness is it ever!! That Mo Love, the creator/owner of MSC, has made a commitment to keeping her cosmetics line vegan is of utmost importance to me and not only because I'm about to hit my 6 year veganversary!! The luxury of beauty items is just that, a luxury. Why (oh why?!) would I want to support a company that tests on animals or uses animal products in order to make my lips/eyelids/cheeks (you name it!) colourful? No animals should suffer for anyone's beauty or, as I like to think of it, artistic hobby and MSC guarantees that. MSC offers vibrant pigments (or as we on the fan page call them: piggies), lusciously scented lip balms (or "bombs" in MSC verbiage), and glossy to the max lip glosses. I have no doubt in my mind that new products will be coming out as MSC has only opened its doors for business as a full-fledged cosmetics company in October of 2010. The number of fans on the facebook page may trick you into thinking that they've been around for a while--but don't be deceived. The large number of fans is simply a testament to the superior product that is MSC. But before I delve into the product itself, I want to start at the start and give you a preview of what you will expect when you receive an MSC package.

MSC packages are always wrapped to perfection. I have ordered from other mineral companies where it's pretty much a gamble if you'll end up with more product all over the pots and inside the bag rather than inside the pot, as it should be! Rest assured that you won't be rolling the dice with MSC.

Notice how everything is all snug as a bug in a rug inside a plastic baggie? Not only that, but they're all comfy inside some bubble wrap too!!

You can also see that there is no spillage whatsoever inside the bag.


The happiness doesn't end there though!

The pots come with a nifty top label on them--MSC's logo is neat, but my camera didn't want to pick up the flashiness. The stickers are actually all shiny!

The products you see here are Awesome Sauce (on the left) and two pots of pigment. I'll put a tutorial up about how to best use Awesome Sauce, but for now I'll tell you that it's basically magic sauce that will help your piggies appear foiled and even MORE vibrant and wonderful. I know, I know, it's hard to imagine!


MSC will also never make you guess which piggies are which, everything comes labeled! You may think: "So what? Isn't labeling a no-brainer?!" You'd be surprised though--labeled things aren't always the norm!


Sifter stickers. Mo has thought of it all. When I received my first shipment of piggies I was THRILLED with what I found under my lids. These sifter stickers are sooooooooo easy to remove! No tweezers needed here!


Just for comparison's sake, this -----------------------------------------> is what some companies use as stickers (this is NOT an MSC pot/pigment). Do you see the sticker? Maybe, just barely? Yeah. Tell me about it. I squint too, just to try to make it out. But even WORSE than a clear, thin, flimsy sticker, is no sticker at all.

What could happen if there were no sticker, you ask?

Well let me show you....

The problem with no sifter sticker is twofold. 1) The safety of the pigment and whether it was properly packaged is in doubt. 2) The pigment floats up above the sifter and is one of the major causes of the spillage/messiness that I alluded to earlier. (This pigment is also not an MSC product.)

So while a clear, hard to get off sifter sticker is much more desired than no sticker at all, I think you can all see that MSC's sifter sticker is definitely what you'd want to find under your piggie lid, am I right?!!


I know that by now you're probably all way too excited to see what the MSC goods are actually like--but you'll just have to hold your horses. I wanted to highlight some of those little things that really help to make MSC the awesome company that it is--Mo thinks about those little things like labels and stickers and those little things don't go unnoticed.

Stay tuned--I'll get brushes dirty next time.

Monday, January 10, 2011

Things to come.

I may be shifting the focus of this blog...just a little bit. Or you know, a lot a bit. Recently I was tremendously lucky to have been given a present from my family for X-mas that they never should have bought for me: a Nikon D90. My Mom casually asked me a few months ago what i might be lusting after and I replied that the only thing I could think of her getting for me would be to pitch in some $ so I could buy a camera that I decided I *needed* (read: wanted, but really really wanted). Unbeknownst to me, the camera was wrapped and under our tree on December 25th.

One of the main reasons for wanting said very very pretty camera (who I have since named Sally) was to help me in taking make-up pictures. And help, it has. Yes, I put on make-up sometimes. And yes, I like to take pictures of it.

Evidence of Sally hard at work:


**All colours used are Madd Style Cosmetics. Read below for more info on the company and where you can find them!!**

And yes. I take pictures with Sally that aren't make-up pictures.


But back to the point:

My make-up addiction (yes, addiction) began as a voyeur sport just about two years ago. A message board I used to stalk (also another of my voyeur sports) had a forum about health/beauty/etc. And one day I learned about mineral makeup and about companies that sell it through Etsy. If you haven't checked Etsy out before, you should. It's an awesome place where you can find handmade goodies. Many mineral companies on Etsy have vegan makeup, which was a surprise to me! I knew that my options as a vegan were greatly limited and thus my pre-addiction make-up routine amounted to: putting on mascara. But suddenly I had been exposed to seller after seller who made colour after colour after colour--and vegan to boot! (This isn't to say that EVERY mineral company on Etsy is 100% vegan, because that is certainly far from the truth--so do your research!) The story gets long and a bit complicated after this, but I have had a lot of fun learning how to apply this awesome stuff and have made a lot of great friends through the Facebook pages of said mineral make-up companies.

My new adventure *may* be writing a few make-up tutorial blogs in the coming few days in order to be eligible to apply for a modeling position at my favorite place to get makeup: Madd Style Cosmetics. They also have a Facebook Fan Page and you should check them out, if you haven't already.

More about all of this to follow...