As you all know, I am *always* on the lookout for vegan (synthetic bristled) makeup brushes. I, somewhat recently, became aware of a company called
Bdellium Tools and their seemingly awesome looking "
Green Bambu" line. The Green Bambu line is described as a series of brushes that are "professional eco-friendly makeup brushes with all sustainable bamboo handles and all vegan soft synthetic bristles with an anodized aluminum ferrule." Bdellium uses bamboo as it is a fairly sustainable resource (did you know that bamboo apparently grows a foot a day?! That's nuts!). The brushes from the Green Bambu series are also not treated with any kind of antibacterial agent and Bdellium boasts that their "synthetic bristles are hypoallergenic and 100% cruelty-free." Sounds like something I should be trying out, right?
There are
three different Green Bambu sets available on the market today and I was lucky enough to scoop up ALL three in a pretty fantastic sale on Amazon.com. Hooray for me!
Now on to the photos/review!
The shipping containers for the sets is awesome. The brushes are packed safely inside of these cylindrical (and pretty darn sturdy) plastic containers. These are worth saving (as far as I am concerned) as they'll come in handy for traveling with your brushes. Inside the cylinders, each brush is inside of a plastic sleeve--this products the bristles from getting smooshed during the shipping process.

This is the "5 pc. Smoky Eye Set". It contains (photographed left to right): the #706 Liner/Brow, #716 Smoky Liner, #777 Shadow, #769 Angled Contour and #781 Crease brush.

Next up, the "5 pc. Mineral Set". Again, photographed left to right: #942 Precision Concealer, #778 Large Shadow, #787 Tapered Blending, #942 Slanted Contour and # 959 Powder Blending brush.

And lastly, the "4 pc. Foundation Set". It contains (left to right): #953 Duet Fiber Foundation, #948 Foundation, #957 Precision Kabuki and #955 Finishing brush.

In the following pictures, I took them using a tripod--and each photograph has been re-sized at 40%. So this will give you an idea of how the size of each brush compares!
5 pc. Smoky Eyes Brush SetFirst up, the #760 Liner/Brow. This is a TEENSY little brush. The point the bristles come to is very fine so I think this would work out awesomely with gel liner!

Next is the #716 Smoky Liner brush. This one is similar to my Sephora brand "
Pro Smoky Eye Brush". It's nice and stiff, but also flexible. I should also mention that these brushes are about 2 centimeters shorter than any of my other brushes. The ferrules are the same length as any standard brush, but the handle itself is shorter. I've used 4 of the 5 "Smoky Eyes" brushes and I didn't notice the short handles--so them being shorter doesn't make them "weird" to use or anything!

Then we have the #777 Shadow brush. This one is almost exactly the same as my
Obsessive Compulsive Cosmetics #008 brush. And let me tell you--I LOVE my OCC #008 brush. I was pleased as punch to get a dupe for it in this set. Especially since the OCC brush costs $20--and I didn't even pay $20 for this WHOLE Smoky Eyes set! I win! The #777 brush is soft and the bristles are nice and uniform.

The #781 Crease brush is a great one. It is very similar to my Alima Pure
#36 Pointed Crease brush. I also really love my Alima Pure brush, so I can see myself using the #781 A LOT. It's a good brush when you want a lot of control in the crease. If it were any fluffier, things could get out of hand (and easily!), but this is a nice way to get a colour right into the crease and nowhere else!

The last brush in the "Smoky Eyes" set is the #769 Angled Contour. This one is similar to another OCC brush that I have (
#005)--but it's a bit smaller. If you follow my tutorials, you will recognize this style of brush as one that I love to use for doing my brow highlight colour. In an upcoming
Madd Style Cosmetics tutorial, I will be using the #769 for that exact purpose--and it works like a charm. The #769 is nice and soft (as are ALL of the Bdellium tools brushes).

This is what the #769 looks like up close.
 5 pc. Mineral Brush Set
I have not actually used any of these brushes yet--I'm slowly planning to dip my feet into the land of "face" (besides the eye) makeup!
To begin, the #934 Precision Concealer. It's soft and small! I like that the bristles are fairly long as I think it would help with getting the concealer into those tricky spots like around the eye and nose.

Then, similar to the #777 (but bigger) is the #778 Shadow. These types of brushes are great for really "packing" on the loose eyeshadow pigments on to your lid. This one is soft and the bristles are packed quite densely. It's super!

The #787 Lg. Tapered Blending brush is one of the reasons I got excited about Bdellium tools in the first place! I don't own a brush like it!! It's duo-fiber and NEATO. I haven't actually used it yet, but I'm excited to! It's very soft and I think it'd work out great for blending out the crease colour. Or I've heard it being used as an "eraser" brush--I'm curious to find out more about that!

Then comes the #942 Slanted Contour brush. It's slanted, that's for sure! And it's DENSE and SO SOFT. Gah! These face brushes have really inspired me to get into wearing blush!

Here's a close up of the #942.

Last in this set is the #959 Powder Blending brush. When I first took this one out of its plastic sleeve, I just wanted to constantly play with it. The tip is so nice and rounded. Like the #942--it is VERY dense and very very soft.

Here's what the #959 looks like up close.
 4 pc. Foundation Brush Set
The #953 Duet Fiber Foundation is up first. Because I'm new to face makeup--I'm not exactly sure how to use this one. I think it might be good for cream products. It's another duo fiber brush and is so very soft.

The #953 looks like this, close up:

(Doesn't that just look SO SOFT?!)
Then we have the #948 Foundation brush. It's your pretty standard foundation brush! (Except that it's a shorter handle (like all of their other brushes), don't forget!)

The #957 Precision Kabuki brush. It's a flat top brush and soft soft soft.

Closet up, the #957 looks like this:

Lastly, you've got the #955 Finishing brush. It's kind of a "goofy" brush--or at least I find it kind of goofy! I think it's meant to...finish...obviously. So for a setting powder, perhaps? It's not very dense, but it's nice and fluffy. (Which I think is how finishing brushes probably should be, but for some reason I still just think this brush is goofy!)

The #955 looks like this, closer up:

Here they all are--lined up in a pretty row:

All in all, I am very impressed with these brushes. I'm especially impressed that I got them
all for under $40!!!! I'd suggest keeping an eye out for them to go on sale through Amazon.com. Because, really, you just cannot beat that price. The fact that the brushes are so nice just sweetens the whole deal!
Look out for future tutorials where I will get these babies good and dirty. :)
Have you tried Bdellium brushes? What did you think? Do you have any tips for how I can use the face brushes? I'd *love* to hear your feedback on that one!
P.S.: The other (and last!) great thing is there are lots more individually sold "Green Bambu" brushes. I certainly have 1 (or 5?!) on my wishlist!

 (Top to bottom, left to right: Milani Power Lash mascara in "Black"; Inglot Gel Liner in "77" (black); Urban Decay 24/7 Glide on pencils in "Zero" and "Yeyo"; NYX Eyeshadow Base in "White"; Too Faced Shadow Insurance; Madd Style Cosmetics Pigments (clockwise from top left): Sub Zero, OHM, Grape Fizz, Birfday Suit, Sparkle Motion, and Space Oddity; Smoky Liner brush; Domed Crease brush; Small Shader brush; Slanted Contour brush; second Smoky Liner brush; small artist brush.)


 (Don't worry too much if the Space Oddity travels down to the lid area--I have a tricky solution for that coming up!)

 (Isn't it just GOREGOUS?!!!!!!!!!!!!)


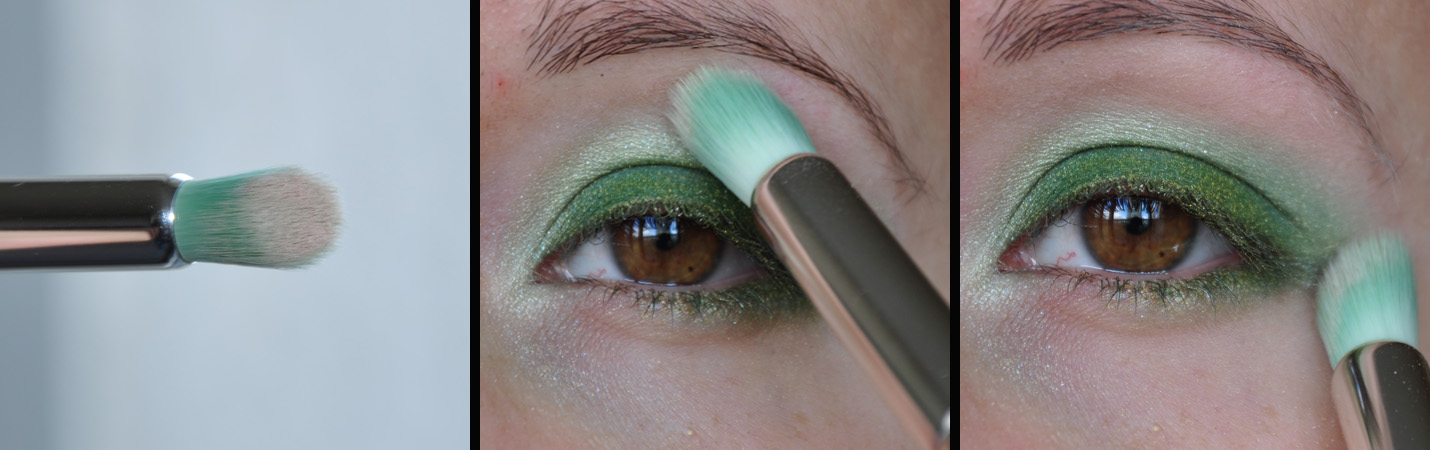
 (Top to bottom, left to right: Gabriel Color Mascara in "Black"; Urban Decay 24/7 Glide-on pencils in "Yeyo" (white) and "Zero" (black); NYX Eyeshadow Base in "White"; Too Faced Shadow Insrance; Madd Style Cosmetics Pigments: Witch's Brew, Soylent Green, Silver Haze and Birfday Suit; Bdellium tools brushes: #777 (Shadow), #781 (Crease) , #769 (Angled Contour) and # 716 (Smoky Eyeliner).)

 (Try to keep the white pencil off of your lashes, if you can!! I never can seem to!)


 (Be careful not to end up with a "bald" spot--like I have in the center of my lid! Awesome Sauce would have helped with this, I promise!)


 (Yep! I have the new Urban Decay lash curler, I love it!)
 (The only thing I did differently for this look is that when I applied Witch's Brew into the crease--I angled it out a bit to create a soft "triangle" at the outer part of my lid (I kept the crease colour more "rounded" in the darker version of this look). I also applied "Yeyo" (a shimmery white) to my waterline. Otherwise everything else is exactly the same!!)


 Next is the #716 Smoky Liner brush. This one is similar to my Sephora brand "Pro Smoky Eye Brush". It's nice and stiff, but also flexible. I should also mention that these brushes are about 2 centimeters shorter than any of my other brushes. The ferrules are the same length as any standard brush, but the handle itself is shorter. I've used 4 of the 5 "Smoky Eyes" brushes and I didn't notice the short handles--so them being shorter doesn't make them "weird" to use or anything!


 (Doesn't that just look SO SOFT?!)


