Pages

Showing posts with label MSC. Show all posts

Monday, May 28, 2012

Madd Style Cosmetics: Sunset-ey

Hi All!!  I know it's been a bit of time since my last Madd Style Cosmetics tutorial, but I hope you won't all hold that against me!  I also returned to my roots a bit and decided to do a phototutorial, instead of my more recent choices of a filmed tutorial.   My plan is to offer a 50/50 ratio of filmed to photographed--how does that sound?  :)

I decided that I really wanted to do a yellow, orange and purple look and the result of my colour combo idea turned out pretty neat (I think!).  When I originally did this look (as a practice run), I used a different yellow (I used Madd Style Cosmetics "Pop Tarte"), but when I came home from work to photograph this tutorial...I had Madd Mail!!  Hooray!  My Madd Mail consisted of the two new Wonderland collections and I knew that I had to use "Unbirthday Star" (which is part of the Psychedelic Wonderland collection) in place of Pop Tarte.  I am happy with how that switch-a-roo turned out, too.  

If you'd like to find out how I achieved this look, then please keep on reading!


To begin, as always, gather all of your supplies!

(Barry M Electric Purple Lengthening Mascara; NYX Eyeshadow Base in "White", MTCoffinz "Under the Rainbow" Eye Primer; Madd Style Cosmetics colours (left to right, top to bottom): Unbirthday Star, Honey Badger, Ichabod, Heart Breaker, Sugar Plum, XRay Spex and Birfday Suit; Matte Black Shadow (I'm using Bulletproof by Sugarpill); Brushes: Flat Shader brush (F70 "Concealer" by Sigma), Pointed Crease Brush (Obsessive Compulsive Cosmetics), Fine Pencil Brush; Large Pencil Brush (Sephora Professional), Large Shader Brush (788 by Bdellium Tools) and an Angled Liner brush (Sephora).  I forgot to photograph a white liner pencil, I use the white one by Korres!)

Start with a squeaky clean eyelid!


Take your chosen primer.  Currently I am relying on my MTCoffinz primer as Too Face Shadow Insurance has been proven to NOT be vegan.  I need to test out my primer from Naked Cosmetics--hopefully I'll remember do that for the next tutorial!  The reason I do like the MTCoffinz primer, especially if I'm not necessarily planning to wear the look to work/for a whole 9 or 10 hours, is that it's quite creamy and sticky. You could get away with wearing just this product as a primer and base, if you were stretched for time.


I swirl my ring finger in the product and dab my finger on the whole eye lid.  I blend this up toward the brow bone and also take it a bit along the lower lash line.  You want to be sure to get an even thin layer.  The primer will help to prevent your eyeshadow from creasing, which is always good!


Next, to ensure that the colours really *pop*, I apply a white base to the entire eyelid.  Using my ring finger, again, I start out in the center of the lid and blend this out to the whole lid and up into the crease. 


As it's been a while since I've done a phototutorial--I forgot a very important pre-step!  Close up pictures mean the brows gotta look especially good!  Ha ha.  Tweeze appropriately.  ;)


As a last step to prep your eye area before starting with colour, line the lower lash line with a white pencil.  I make this line thicker at the outer eye and taper it as I move toward the tear duct.  Also, be sure to line your inner V/duct area with this pencil so that your inner highlight will really stand out.


Now for some colour!  Take a flat shader brush and pack MSC's Unbirthday Star (a super awesome bright shimmery yellow) into the bristles.  I press the colour into the bristles by using the inside of the jar's lid--this will help to prevent fall-out, as well.  Apply this colour in a half-circle shape right in the center of the lid.  


Next, take MSC's Honey Badger (a great true gold colour--and this look was the first time I used the colour!  It's such a pretty colour, too.  Expect to see it a lot more in the future!) on the same brush (just flip the brush over), and apply it on either side of Unbirthday Star.  


You will also want to take the colour up aroundthe top edge of Unbirthday Star.  Just apply the colour to the tip of your brush to help give you some control with this step.  Lightly blend the Honey Badger in with the Unbirthday Star by "patting" between the colours with your brush.  Since we're working with a yellow and a gold/orange, these colours blend together very easily.


Lastly, for a bit of a truer orange pop on the lid, take MSC's Ichabod on that very same brush and apply it to the rest of the outer and inner lid (where you haven't applied any colour yet).  Blend this in with Honey Badger just as you did in the previous step--patting from Ichabod into Honey Badger very lightly.


Take Icabod up above the center--as you did with the Honey Badger.  With all of this blending, if you feel you lost some of the intensity of Unbirthday Star or Honey Badger, just re-apply another layer of those colours--using that same brush.
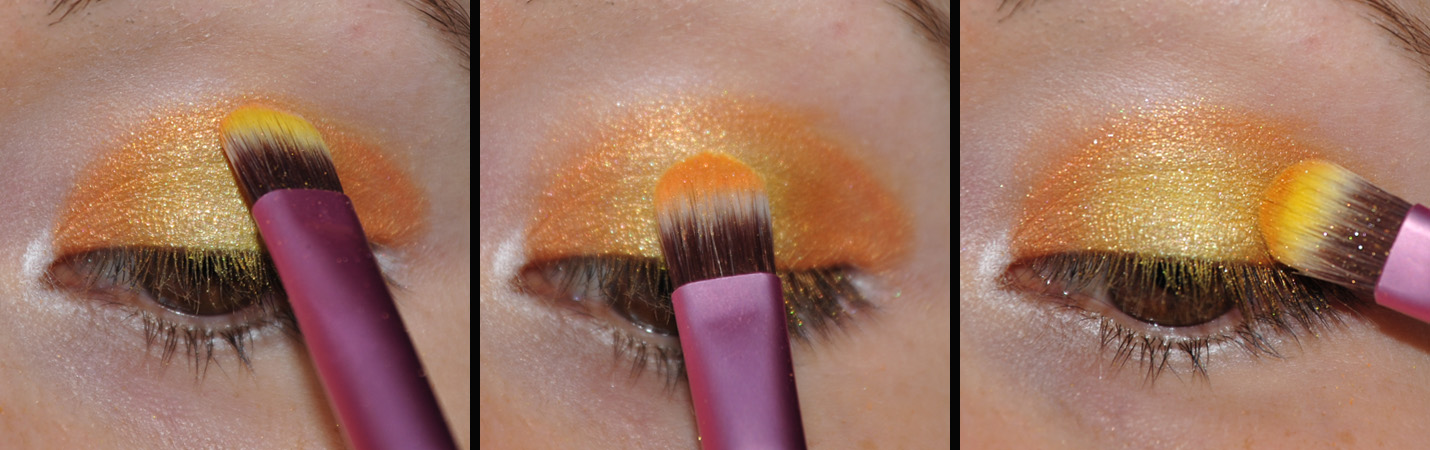

At this point, you should have something like this:


Now you're going to take a pointed crease brush and dip it into MSC's Heart Breaker.  To get away with using purple and orange together, especially in a look where you want the result to be kind of blended, choose pink toned purples!  It's a tricky trick!  Apply Heart Breaker to the first half of the crease.  You don't want to "over-sweep" this colour on, or you'll loose some of the glitter.  But you also want this colour to be quite soft--so sweep just a little!


Using the same pointed crease brush, dip it into MSC's Sugar Plum (a plum purple with pink undertones).  Start by dabbing this colour to the outer corner of your lid.


Then gently blend this colour up from the outer corner into the outer half of the crease.  You can blend this in with the orange a little--but you can see I've essentially created a soft cut-crease effect.


Taking a small pencil brush, dip it into Sugar Plum.  Apply this to the lower lash line.  Concentrating most of the colour to the outer part of the lower lash line (be sure to connect it up to where the colour is on the upper lid) and then tapering it in toward the inner lower lash line (as you did with the white liner that you used as a base).


Switching to a bigger pencil brush, take MSC's XRay Spex (a pretty neutral with a shimmery pink duochrome) and apply this to the inner V/duct area.  Blend it in with the Sugar Plum on the lower lash line, and up above into the inner crease into the Heart Breaker.  This will help to open the eye up.


At this point, your eye should look something like the below picture.  To help soften the edges of the crease colours, you will want to be sure to apply your brow highlight shade!


Take MSC Birfday Suit (a matte light toned nude brown), or whichever highlight shade you prefer, on a fluffy shader brush.  You could go with a shimmery highlight, for example.  You could even dust some of that same XRay Spex under the brow!  That would be pretty, too.  I do tend to prefer to keep my brow highlight matte though--keeps the attention on the lid, I find.  Start by applying the highlight to the highest arch of your brow.


Next, blend the Birfday Suit to under the inner part of your brow and under the outer part of your brow.  As you're doing this, be sure to blend down toward the Sugar Plum to help soften that harsh edge.  I also like to take Birtday Suit down below the outer corner of my eyelid to help create the shape of that crease colour.  As my eyes are down-turned, I like to keep things pointing "up" toward the end of my eyebrow.  


It's amazing the difference a nude matte shade as a highlight can make, huh?  


To keep this look nice and soft, I decided to go with a thin line of matte black shadow for a liner.  Make this line thicker at the outer corner of the lashes--this will help to make your lashes look fuller.  


Take a white eyeliner pencil and line your lower waterline.  This will help to make your eyes appear a bit bigger.  A good trick to lengthening the life of your waterline colour is to then "set" it by pressing a matte shadow over the top. 


I wanted to do something a bit more "fun" for a mascara--so I went with purple!  This was my first time using it and it didn't turn out quite as good (or as "electric purple") as I was hoping, but you gotta try things out before you know how they'll end up.

 
 Here is the final look:


I hope you all enjoyed this tutorial!  I also hope it will inspire you to do some yellow, orange and purple looks of your own.  And if it does, I would love love love it if you linked me to some pictures of your looks in my comments section!!  :)

As always--if there is a particular MSC colour you'd like to see me use in my next tutorial or if you have any other suggestions of types of looks you'd like to see or tips you'd like me to share, let me know in the comments section.

Wednesday, March 7, 2012

March Happiness Project: Day 7 (+bonus MSC EOTD)

I've been up today since 4:30am and I'm so tired that I keep forgetting what I'm doing at any moment.  BUT.  I didn't forget that I need to do Day 7 of the Happiness Challenge!  And lucky for me, today's topic is a no-brainer.


This is what I found!  7 Steps to smiling--in case you don't know how?

Here is the cliff-notes version:
"1. Enjoy the many benefits of a smile. In order to want to smile, it really helps to know what benefits a smile can bring to your day. 
2, Become comfortable with smiling. If you're not used to smiling regularly, overcoming your nervousness or cynicism about smiling can take a little practice but like any habit, it's easy to reform with time. 
3. Make your smile genuine. While it is perfectly possible to crack a smile when you feel terrible, angry, annoyed, or you're up to something nefarious, a genuine smile is much harder to fake; indeed, only around 10 percent of the population can manage that feat.[7] A genuine smile is detectable by others because it is accompanied by a general glow, smiling eyes where the outer corners crinkle and the lower lid tightens, and a reassuring demeanor that helps the viewer to feel more at ease in your presence. A genuine smile comes from being happy, positive, and from drawing your feelings from the heart.
4. Smile with your eyes. A wholehearted smile will naturally draw in the eyes. It is commonplace to hear a person say "her eyes were smiling", or to say "he didn't mean it; he was smiling but his eyes weren't". The eyes are essential for a genuine, warm smile. Your eyes light up, twinkle, and reflect your happiness. While it's hard to fake this unless you're really feeling it, you can try this exercise:
  • To get a feel for how to make your eyes smile, stand in front of a mirror and practice smiling, but concentrate only on your eyes. You may find it helpful to cover the lower part of your face with a piece of paper. Play around with it a bit, and you'll find that you can make your mouth smile when your eyes aren't smiling, and you can also smile only with your eyes. When your eyes do smile, remember how it feels, which muscles are working and how. With practice, you may discover how to smile with your eyes at will by relying on your feelings and muscle memory. 
[I quoted #4 in its entirety because it is extra hilarious]
 5.  Practice your smile. There is no harm in practicing your smile – doing so will increase your smiling confidence, improve your sense of well-being,[8] and help you to learn which of your smiles are your best. Look at photos of yourself smiling, with a closed mouth, open mouth, and from different angles. Which smiles and poses make your face light up the most? Which smile displays your other features to their best possible advantage? Which smile comes across as the most natural, the most "you"? 
6.  Maintain good mouth hygiene. One thing that can cause you to fear smiling is the worry that there is something stuck between your teeth, or that you have bad breath. Eliminate these hygiene sources of worry by taking active steps to keep your mouth fresh and clean. Brush your teeth regularly, carry floss with you wherever you go so that you can clean up after dining, and have breath freshener on you at all times (natural or commercial). In addition, see your dentist regularly for teeth check-ups and cleaning, as well as discussing options for teeth straightening, etc., if this is a concern for you. When you smile people will inevitably look at your mouth, so following these considerations will help you make a better impression, and, more importantly, a healthy mouth will make you feel more confident about smiling. 
7.  Expect smiling to be difficult in some situations. Smiling on demand can be difficult, whether it's for a photo or for the sake of keeping mom happy when the relatives you can't stand visit. This is because you are feeling self-conscious or you lack a genuine reason for smiling. In these sorts of cases, smiling needs to come from your memory of good smiles along with a little self-kidding or jokes in the head."

That's pretty funny, you have to admit.

And even though I'm dead tired today, I managed to slap some Madd Style Cosmetics on my face.


Products used:
  • MTCoffinz "Under the Rainbow" eye shadow primer
  • NYX Eye shadow Base in "White"
  • Madd Style Cosmetics "Brad" applied to the first 2/3rds of the lid
  • Madd Style Cosmetics "Yukon Cornelius" applied the outer 1/3rd of the lid
  • Madd Style Cosmetics "Zazz" in the outer eye/outer crease (this colour is seriously a bajillion times more awesome in person--I'll have to use it again when I can take pictures in actual DAYLIGHT--I know, I know.  That's crazy talk...) & along the lower lash line
  • Madd Style Cosmetics "Golightly" in the duct and inner half-ish of the crease
  • Madd Style Cosmetics "Birfday Suit" as a brow highlight
  • Sugarpill "Bulletproof" for the winged liner
  • Urban Decay 24/7 Pencil in "Perversion" on the waterline
  • Urban Decay "Lush Lash Mascara" for mascara
The end!  (I think that's the end...*falls asleep on her keyboard*...)


Wednesday, May 25, 2011

Madd Style Cosmetics: Lucky Emerald and Amethyst

I posed the question to the Madd Style Cosmetics facebook fanpage the other day about which colours the fans would like to see used in a tutorial. The wonderful Angela H. suggested that I do something using the Dark Crystal collection and I willfully complied!!

The Dark Crystal collection was inspired by different precious jewels (Sapphire, Citrine, Opal, Emerald, Ruby and Amethyst). There are 10 collections listed on MSC's Etsy page still! It is currently on sale for just $18!! Those of us who already snagged one are surely very pleased with the purchase, and you will be too!! For those of you who are link phobic, it looked something like this:


For this look/tutorial I decided to play with the Emerald and Amethyst piggies! If you want to find out how to achieve this look:

(Photo taken without flash.)

Please keep on keeping on (with the reading).

First, gather all of the relevant supplies!

(Left to Right: Barry M "Intense Black 3 in 1" Mascara; MtCoffinz "Under the Rainbow" primer; NYX Eyeshadow Base in "White"; Madd Style Cosmetics piggies in (starting clockwise from the palest green): Lotus Bloom, Emerald, Amethyst, Birfday Suit and Lucky (this colour was sold with the Sham ROCK collection, but if you don't have it, you can substitute it for a medium/light green colour); small eyeshadow brush; pointed crease brush; slanted/angled brush; angled eyeliner brush; concealer brush/small synthetic eyeshadow brush; Urban Decay's Glide-On 24/7 pencil in "Yeyo". *whew!* *takes a breath*)

To begin, prime the lids. For this tutorial, I used my newest primer: MtCoffinz's "Under the Rainbow". So far I am very happy with this primer--it's stickier than my one from the All Natural Face. I took a fun picture of it just because I love it so much:


ANYWAYS. To apply it. Rub your ringer finger on the top of the product. Then, dab it into the center of your eyelid. Next, blend it out over the entire eyelid, up to the crease, down into the inner eye/duct area and the lower lash line. You want to make sure to have nice and even coverage of your primer as it will help your piggies stay in their place and not crease! All good things to have happen!


Then, to help brighten your piggies and really help them "pop" against your eyelid, apply a base. As usual, I used my go-to white base, NYX Eyeshadow Base in "White". Applying this is identical to the method I use for my primer. Ring finger on product, dabbed into the center of the lid, and then blended out across the whole lid (up to the brow, down into the duct area).


Now your lid is ready! Yay!

For the first piggie--grab Lotus Bloom (it's described as a "buttery sea foam green with a shimmery aqua duo-chrome") on your brush. Swirl your brush around on the inside of the pot's lid (to evenly distribute the pigment throughout the bristles of your brush) and then pat the colour on to the inner 1/3rd of your lid. Also, pat this colour down to your duct area. Patting or pressing the colour on, rather than sweeping it, will help to minimize fallout and will help you keep all of the pretty glitter on your lid.


Using the same brush, get some Lucky on your brush. Pat this color on to the middle...3/5ths of your lid! (Ha...math...it doesn't need to be exact...just leave some of your outer most lid empty!) I forgot, somehow, to take a picture of the exact "end" placement of this pigment, but you'll get the idea in the next picture! Gently blend Lucky into Lotus Bloom by patting the line between the two colours with a bit more Lotus Bloom (or Lucky, whichever you prefer).


Changing brushes to a pointed crease brush, dip your brush into Emerald. Swirl it around on the inside of the lid (as usual) and place it on the outside corner of your lid (see where Lucky ended up?!). Then, keeping your eye open, sweep/pull the colour from your outside crease into the middle/inner crease. By keeping your eye open, you concentrate the colour into the deepest part of your crease and you won't end up with dark green going up to your brow bone (unless you want dark green up to your brow bone--then by all means, do what you gotta do! :) ).


At this point, you'll be looking something like this:


Next, for the lower lash line, you're going to switch brushes again. This time, grab a small concealer brush (or small synthetic eyeshadow brush) and dip it into the NYX Eyeshadow base. CAREFULLY (you'll notice on the left picture that I wasn't so careful) place this along your lower lash line. You can use a white eyeliner for this step, but my white eyeliner ALWAYS get stuck in my eyelashes, so I tried this out to be different. Then, grabbing an angled eyeliner brush (pictured in the middle, obviously), dip it into Amethyst. Then apply this (by patting the colour on) over the white line you just applied to your lower lash line.


For a highlight, change your brush again. I have been on a roll with using this goofily shaped slanted brush from OCC lately. Dip the brush into Birfday Suit (my mostest favorite highlight as of late)--a light matte nude--and apply it to your brow bone. Use the colour on the brush to fade on the line between the Emerald and the crease to help soften the overall look.


To finish off the look, if you so choose, you can line your waterline with a white eyeliner pencil to help open up your eyes a bit. The waterline is the part of your eyelid between your lower lashes and your eyeball! Don't poke yourself. And try not to pull on your lid! Once you get used to doing this, you can just gently pull the pencil along your waterline without even touching your lid with your other hand--just let the pencil do the work and don't be afraid! I like to use my UD pencil in "Yeyo" for this because it's not an opaque white--it ends up being more of a shimmery white that you only see some of the time. It's subtle, but great.

(I do not know why this picture turned out so fuzzy!)

Apply some mascara--and then, you're finished!!

(See on the picture on the right how the lower lash line has that gleen? Yeah, that's the Yeyo magic I was referring to!)

I hope you enjoyed this tutorial! If you need any extra clarification on any of the steps, let me know! And I hope you'll head on over to check out this neato spreadsheet I put together to help keep all of the Madd Models' tutorials in one place and organized by tutorial type, colours used, etc.

And last but not least--if there is a colour you are dying to see used--let me know! I probably own it. ;)

Monday, April 18, 2011

Madd Style Cosmetics: Oz is Down the Hidden Track

Hi! *waves*

The other day I wanted to try pairing Madd Style Cosmetics's Hidden Track (described as a mustard brown color with a murky green duochrome) with Oz (a jewel toned emerald with multicolored shimmer and yellow glitter) to see what would come of it. I had previously done a tutorial combining Hidden Track with a yellow, but this time I wanted to pull on that green duochrome in it and pair it with a green. I quite liked the combination!

So, if you want to find out how I achieved this look:

(This was taken without a flash.)
(All pictures can be clicked for larger versions.)


Then please keep on reading.

To begin, gather all of your supplies!

(Gabriel Color mascara in "Black"; NYX Eyeshadow Base in "White"; The All Natural Face Shadow Primer in "Buff"; Madd Style Cosmetics piggies in: 3rd Wish (from the Sham ROCK collection), Hidden Track, Oz and Tweaker; eye shadow brush; fluffy crease brush; smudger brush; pointed/domed crease brush; fluffy fluffy blending brush.)

As always, start with a clean eye and apply your chosen primer and then a base. Using my finger, I applied the All Natural Face primer to the center of my lid and then blended it out. Next, using the same method, I applied the NYX Eyeshadow Base on top of the primer and blended it out.

(I have some dry skin, as you can see, at my lash line. Not good, but I didn't know it was happening until I put the primer on!)

Taking 3rd Wish (available in this amazing collection!) on an eyeshadow brush, I applied it to my tear duct and into the first 1/3rd (or so) of my lid. Remember, as with all Madd Style's piggies, you want to "pat" these on to your eyelid. Avoid "swiping" as much as possible!! You'll lose the pretty glitter if you do that. With colours like 3rd Wish and Hidden Track, however, they're more so "shimmery" colours and thus can be swiped on, if you so choose. But I'm in favor of you all getting into the (good) habit of just always patting on your piggies!


Next, taking Hidden Track on the same brush, I applied it to the rest of my lid.


To blend these two together a bit better, I put a bit more Hidden Track on my brush and lightly patted it where you see the line between the two colours.


Now you're ready for your crease colour. I switched to a fluffy crease brush and got some Oz on to it (dip your brush into the pigment and then "swirl" the brush around on the inside of the lid to get the colour evenly distributed throughout the bristles) and apply it to the outer eye and pull the colour up into the crease towards your inner eye (follow the crease though, don't bring this dark colour in down towards your tear ducts or anything like that! And don't bring it in all the way into the inner part of your eye--that'll get a bit too dark and will make your eyes appear smaller than they really are).


At this point, we have something like this. Notice how the Oz is just kinda sitting there on the outside looking kind of awkward and unblended with Hidden Track? Don't worry, we're going to fix that!


Take that same fluffy crease brush and apply a bit more Oz to it. Then, put the brush on your outer eye and gently apply the colour to the outer-most part of your lid. Gently blend it with Hidden Track and you'll end up in a much better (and prettier!) situation.


For the lower lash line, take a smudger type brush and dip it into Oz. Then apply this to your lower lash line, but only bring it in about 1/2ish way from the outer corner.


When I got to this point, I decided the shape of Oz wasn't quite what I wanted. So, I used my magic...finger (!!) to clean up the edges and "erase" some of the Oz that went out too far in the outer corner. By the end of this, I had a more "rounded" shape.


Now, you'll notice that Oz (in the inner eye) is kinda just floating around and isn't blended in very well. To solve that, take 3rd Wish again, but this time on a pointed/domed crease brush and apply it from the ducts up towards Oz.


Lastly, for the highlight--I used Tweaker on a fluffy fluffy brush and lightly applied it on the brow bone while also blending it down towards Oz to make that shift between Oz and Tweaker a bit more soft.


All that's left is mascara and it's finished!

(With flash)

(Without flash)

I think the golden tones in 3rd Wish played nicely with the golden qualities of Hidden Track. And Oz also has a bit of goldeness to it (because of the yellow glitter)--so all three colours jived together quite well (at least I thought so!). I hope you enjoyed the tutorial! If you have any questions or want further details about one of the steps, let me know. :)

Annnnd, if you have any Madd Style Cosmetics piggies that you'd love to see used in a future tutorial, just let me know in the comments and I will try to work your request into my next pictutorial.