I posted a look similar to this in the Madd Style Cosmetics group page on Facebook a while ago and the ladies in the group liked it so much that I knew I had to do a tutorial for it! I also figured that with NYE coming up that it would be a good occasion to post it since it's a rather dramatic look. The super fun thing about a look like this is that you can make it any colour you want--I did a pink version a few days ago and it was super fun too!
If you'd like to find out how I achieved this look...

...then please keep on reading.
(Also--you will notice that I've formatted this tutorial differently than my past pictutorials. Instead of doing collages for some steps, I've left each picture as as single "step". Please let me know what you think! :))
First, as always, supplies! On the left you've got your Madd Style Cosmetics "Optimus Primer" and NYX Eyeshadow Base in "White". Also appearing are the trusty (and ever shrinking to never be replaced until I go through my back-ups I purchased a few years ago) Urban Decay 24/7 liners in "Yeyo" and "Zero". MSC piggies that are present (clockwise from the top left): Cry Baby, Pew Pew Pow!, Blammo!, Up in Smoke "Black" (but any matte black will do!), Golightly, and Sapphire (this colour is now discontinued, but any dark blue will do). A tube of mascara: I am using UD's Lush Lash Mascara--also something I need to use up before I find another brand to support. Then a selection of brushes: a flat concealer style shader, a dense pencil brush, an angled liner and a fluffy crease/pencil brush. Lastly--Obsessive Compulsive Cosmetics Lip Tar in "Nylon" and some Duo lash adhesive for falsies. (I forgot to picture the falsies, they are Ardell's Accent Lashes in #305.)

To start out--clean your lid as best as you can! (Last night I had on this super glittery look and I washed my eye like three times and this residual glitter just keeps hanging on!!)

Next, prime! Here I've applied Madd Style Cosmetics "Optimus Primer" all over the lid. Next I blended it out using my ring finger. Blend this out up just past your crease and whatever is left on your finger should be swept along the lower lash line. Primers help your shadows to stay in place and not collect in your crease line. These are both things we want!

Now--keeping your eye open and looking straight forward into a mirror, you want to trace a line using a black eyeliner pencil all the way from the inner to outer crease. If your eyes are like mine and are hooded/semi-hooded--keeping your eye open is the way to go here as it will help the colours to be visible when your eye is open. It would be sad to do all of this work and then realize when you're all finished that it basically just looks like blue liner! :)

At the end of this step, you'll have something like this:

Next, draw a short line at your outer lower lash line and extend it up toward the end of your eyebrow. This will help you make sure you get a good shape to the whole look.

Lastly you just need to connect your upper line to the angled line in a bit of a "swooping" curve. Don't worry if it looks messy--we're going to blend it out and smooth it out. Just lay it down as best as you can.

Now--take a pencil brush and start to smoothing out the lines. You don't want to blend it up, just smooth it out. Then take some more black pencil and start to blend it from the outer eye toward the middle of the lid. You want about 1/3rd of your lid to have a black base applied to it.

Lastly for your base--apply a white base to the rest of the bare lid. I applied this with my finger, but you can use a concealer brush. I also made some effort to blend it into the bottom part of the black pencil so there wouldn't be harsh white/black line.

Do darken and crisp up your black liner, take an angled liner brush and dip it into a matte black. Trace all the way around the edge of the black liner.

At the end of the tracing, it will look something like this:

Now for some colour! Hooray! Begin with a flat shader brush and dip it into MSC's "Cry Baby" (an awesome minty blue colour) and apply this to the first 1/3rd of your lid. Pat this colour on nice and opaquely. Patting it on, instead of "swiping" it on, will help to prevent blue fallout all over the bottom of your eye.

Next, using the same brush, apply MSC's "Pew Pew Pow!" to the middle 1/3rd of your lid. This is a rather glittery colour so you'll want to "pat" this one on as well!

To blend the seam between Cry Baby and Pew Pew Pow, take your brush and gently pull Pew Pew Pow over into Cry Baby. Alternate between patting motions and short sweeping motions here to get a perfect transition.

Next, using the same flat shader brush, dip into a dark blue (I'm using MSC's "Sapphire") and pat it on the remaining part of the lid. To blend between Pew Pew Pow! and Sapphire, do the same thing as in the previous step.


Make sure your colours are all nice and blended!

Take a white eyeliner pencil and line the rest of your lower lash line and inner tear duct area. Blend the white into the black pencil that you had placed there before.

Using a small brush (I used a pencil brush), apply the same colours (in the same order) to your lower lash line. Here you see it goes: Cry Baby, Pew Pew Pow!, Sapphire and then Blammo!

In the inner tear duct, highlight with a sparkly white or light blue. I chose to use MSC's "Golightly" (a very pretty sparkly light blue). I applied this to the duct using the tip of a fluffy crease brush, but you can use a more precise brush if you would prefer. Blend Golightly up a bit into the inner part of the eye and up into the beginning of that black liner to diffuse it a bit.

When I do dramatic looks, I like to line my upper and lower waterlines with black. You don't have to do this if you don't like black on your waterline. You could use a dark blue or even a grey--that would look neato!

Then all you need is to darken up the lash line a bit and apply some mascara to the upper and lower lashes. You can use liquid liner if that is what you like best. Here I used the same matte black on an angled liner brush and just pushed it into the upper lash line and then blended it out slightly for a smoky effect.

I was going for a very crisp look here so I took a cotton bud with some oil-free makeup remover and went along the top edge of the black liner. This is also your chance to make sure your eyes match up as best as you can get 'em to!

To finish everything off I applied a pair of half-false lashes. And then....done!!
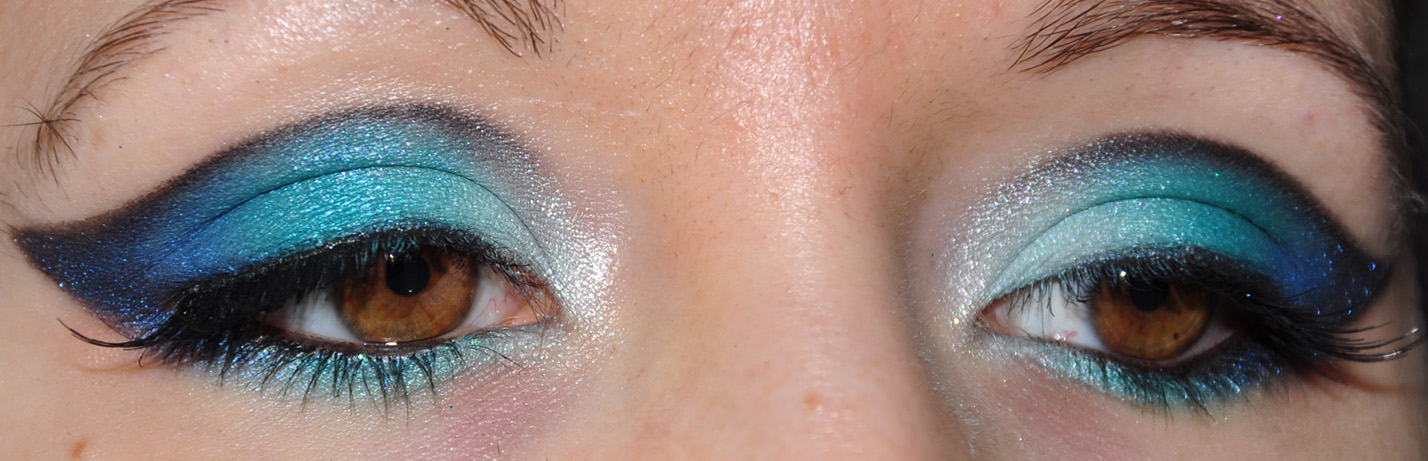 |
| Taken with flash. This is good because you an see the sparklyness, but not so good because my camera's flash turned things much more blue than they are! |
 |
| Taken without flash. This is more true to colour, but doesn't show off the awesome sparkles that you could definitely see with the naked eye! |
My lash step was to apply some crazy bright pink lipstick. You could put on whatever colour you want--and likely the bright pink was a bit too much, but what's the fun of playing it safe?! I like to apply my OCC Lip Tars with my fingers, so that is what I did here.

I hope you all have a very safe New Years Eve and a very happy 2013!!
this is stunning! :) / http://yolandaas.blogspot.co.uk/ (don't know if u can see my blog when i comment using disqus?)
ReplyDeleteI will definitely check your blog out. And thank you very much for the compliment. :)
ReplyDeleteThis look is amazing!
ReplyDeleteThank you!! :)
ReplyDeleteThese are waves in the sea =)
ReplyDelete