Yesterday, while picking up groceries, my husband mentioned that these funny looking buns he made the night before tasted like English muffins when toasted. English muffins make me think of one thing and one thing only: Egg McMuffins. Are Egg McMuffins even on English muffins? I have no idea. I haven't had one in YEARS. But that isn't the point, because a few Halloweens ago, my husband dressed up as the notorious McMuffin fiend Michael Phelps. Due to said nature of that costume, we came up with veganized McMuffins and brought them in a paper bag (we tried to aquire a McDonald's paper bag, but things fell through and we had to improvise) to snack on during the party we attended. Fast forward a few years...I make these treats for myself every once in a while and yesterday having something English Muffin-esque was enough to set off my craving. It also helped that both the Yves veggie bacon and the Daiya cheese were both on sale. Score! The only other required item is tofu--to act as the egg.
Last night I was sooooooo excited to go to sleep just so I could wake up to make myself breakfast. And once I got myself all set up, I decided to take a few pictures of the process so I could write up a bit of an instruction blog. :)
To begin, you need a block of "Firm" Tofu. Cut it in half, length-wise, and then cut each half into three even slices. Put a pan on medium/low heat with a bit of canola oil and place the six pieces like so:
Fry these gently (make sure they don't stick to the pan!!) until they reach a golden (but still soft--you don't want "crispy" tofu here) brown. Flip once. Cook the other side in a smiliar fashion. Once the second side has reached its desired colour, grab a cup and put some sea/rock salt into it with about...3 tablespoons (?! I may be completely making up that amount...it could be more like 4 or 5?) of water. Mix the salt and water together with a spoon and then pour the entire contents into your frying pan with your tofu. This will cause some sizzling, don't be alarmed! Continue to fry the tofu until the water has evaporated/been absorbed.
Next, turn on your oven to "broil" and move the rack up to top. Then, take a pizza pan/cookie sheet and place the slices of tofu nicely apart on your pan or sheet. Top your tofu with your choice of vegan cheese. Typically I use vegan American slices, but this time, I used Daiya cheese. Put an even layer on the top of each tofu slice, like so:
Put your pan/sheet into the oven and keep the door open so you can check on things to make sure the cheese isn't getting too crispy/browned. While the pan/sheet is in the oven, take your veggie bacon slices and fry them up on your stove top. I messed up this morning and fried my bacon much too crispy. Try to avoid that, if you can.
While the bacon is frying and the cheese is getting melty, take your bread item of choice and toast it in your toaster.
By the time your bread has popped out of the toaster, your bacon should be ready, and your tofu too!
Assemble all of this deliciousness.
I found that with the thickness of my bread, I needed two pieces of bacon to give the desired amount of bacon-eyness. I also added a bit more cheese to each piece of bread and then broiled that as well on my subsequent sandwiches.
Just looking at these pictures is making me wish I could eat another one RIGHT NOW!
:)
Sunday, February 27, 2011
Thursday, February 24, 2011
My continuous search for a primer!
As you, my readers [hi readers!!], know--vegan eyelid primers are a hard hard thing to come by. I have tried SoBe's Primed and Proper (with relatively good results) as well as The All Natural Face's Eyeshadow Primer (both in Buff and in Black--the Black really works well as a base, but I don't find it works as well as a primer. The Buff works, but I definitely get creasing after a few hours).
My next foray into the land of vegan primers is going to take me to Evil Shades Cosmetics's Evileyes Primer. The explanation of the texture makes me weary, but also intrigued. I was also weary of The All Natural Face's packaging and the fact that their product comes in a pot--but the pot part of the whole thing hasn't turned me off yet. I'm optimistic that this "mousse" texture in Evil Shades's primer will be different in a good way. My fingers are seriously crossed.
Have any of you had any experience with the Evil Shades primer? If so, I'd love love love to hear about it.
This blog definitely doesn't have a good review of it. But in contradiction, this review is favorable.
So I figure it's best to try it out for myself, yes? :)
Monday, February 21, 2011
My Madd Style Cosmetics Storage System
I don't really think my storage can (or should) be called a "system"--but I dig the alliteration--so system it is! I am one of those who finds that storing my Madd Style Cosmetics piggies on their sides leads to me being able to more quickly navigate through them to find what I need and by keeping them on their side, they take up much less space. Two wins for side storage! But I know many people are fearful of keeping their pots on their side because the risk of pigment loss is more prone to occur--so not only will I be showing you what I use for my storage, but I'll also give you a quick tip on how I keep my pigments inside their pots and not down in my storage unit. :)
It was rather timely for me to put this together today, because as you will see, my storage was overflowing! Photographic evidence:
Eep!! So yes! The containers that I use are called "Storage Accessories." I bought them at Michael's and they are almost exactly what I had in mind for my storage when I set out to find them. The three dividers you see are not movable--the container itself does come with optional small dividers, but to fit the most pots in, I don't use the small dividers. And lucky for me, I have an empty one on hand!
(Those little slats you see on the right hand side are used to keep the optional dividers in place.)
For ease's sake, I decided to move my black MSC pigments into my empty container and then to shift things over to make room for my overflow. Now I'm left with this:
See? It's all better now!
For those of you who are having mild (or severe) panic attacks at the thought of having your pigments on their sides--fear not! First of all--Mo does a GREAT job of getting her sifters on really well and I find that my lids close more tightly than with other company's pots. Hooray for that. Not only that, but there is one easy thing you can do to prevent the pigment from getting into a position where it could fall out.
Here is what I would call a "problem" pigment (MSC's Frankenstein) for side storage. I don't go around in my storage trying to find these pigments. If I'm doing a look with three pigments, I pick them all out and when I open them, if any of them look like this, here is what I do.
(See how the pigment has settled on the very top of the sides on the left? When your pigment ends up there it is caught between the pot and the lid, but if you're not careful, that pigment can fall off the top and on to the grooves--once it's over there, there is a risk that it can fall out into the bottom of your storage container.)
Here is what I do to solve this little issue. I take the lid of the pigment, place it on the top of the jar, and slowly push it from the left to the right--all of that problem pigment will fall down into the jar. Which is what you want!
Then what you're left with is a happy non-problem Frankenstein!
See?! Easy-peasy!
I'd love to hear about how *you* store your pigments!!
Edit (3:29pm): Oh! And one last thing about not losing any pigment to your side storage-ways...If you do open up a pot and you have pigment that has traveled into the grooves--use that pigment first (with your brush)! :)
Wednesday, February 16, 2011
Madd Style Cosmetics: Two colour looks.
Recently I have fallen in love with the simple beauty of two colour looks (the inner colour being "light" and the outer colour being more "colourful"). The wonder of Madd Style Cosmetics' pigments is that many of them are duochrome or have really neat undertones--these two colour looks I've been into really help to play up this wonderful feature, but things are kept simple, relatively subtle and yet still so interesting! And as you will see at the end--the addition of a winged eyeliner can really kick the whole thing up a notch if you're craving something with a little bit more pizazz.
The pictutorial I have for you today does not include liner--I plan to do a separate tutorial about liner--but the logistics of doing that in photographs hasn't quite sorted itself out in my head yet! But don't worry--it's in the future line-up! :)
Today's tutorial involves the following supplies:
The pictutorial I have for you today does not include liner--I plan to do a separate tutorial about liner--but the logistics of doing that in photographs hasn't quite sorted itself out in my head yet! But don't worry--it's in the future line-up! :)
Today's tutorial involves the following supplies:
(As usual--NYX Eyeshadow Base in "White", The All Natural Face Shadow Primer in "Buff", Top Left pigment: MSC's Stargazer, Top right pigment: MSC's Columbia, Bottom pigment: MSC's Pixie, flat eyeshadow brush, tapered fluffy blender brush, angled eyeliner brush, fluffy blender brush. I used the same base, primer and brushes in the two looks I will be posting at the end of this tutorial as well!)
First you will want to prime your lids. I decided to give my All Natural Face primer another go--this time using much less than the first time I gave it a whirl. And like most things, less really is more. I found this primer to be rather effective in preventing creasing and just with generally helping my pigments stay in their place. As you can see in the picture--the product comes in a pot and is rather solid--so using your finger is the only good way I think this can be applied to your eyelid. As shown on my index finger, this is the amount I applied to one eyelid--from the lid up to the brow.
After primer comes a base. Using your finger (or you can use a concealer brush), apply NXY Eyeshadow Base to the center of your lid and then dab/blend it out towards your brow bone.
Next step is applying Stargazer with a flat eyeshadow brush to about 2/3rds of your lid. Remember--pat these pigments on! Patting them on will help press them into your base and thus help them to stay where they're meant to be--and it also helps to both prevent fallout and retain maximum amounts of glitter.
(Isn't Stargazer pretty?!)
Now you will take your tapered fluffy brush and dip it into Pixie--swirl your brush around in your pot's lid to help get the colour evenly dispersed and packed in--and then apply the colour to the outer 1/3rd of your eyelid. Then just lightly pat the colour inwards towards Stargazer using that fluffy brush (the results of this "blending" is shown in third picture). You also will want to blend Pixie upwards towards your brow and into your crease (as shown in the fourth picture) to give it a fuller shape. (Depending on your eye shape, you may skip that last step--I like to bring my colours up above my "real" crease because my eyelids are semi-hooded.)
To do the lower lashline--use an angled liner brush and applied Pixie from the outside corner of your eye to about 1/2 way in.
Now, taking your fluffy brush--apply Columbia underneath your eyebrow. If you want to keep your brow less sparkly--you can use a more neutral colour or even just pressed powder. I find Columbia to be pretty sheer and just a little sparkly when applied with this fluffy brush, so it works out for me. And, as per usual, I like to bring this colour down into the inside of my eye and into my ducts (as you see being done in the third picture).
Finish it up with some mascara:
And you're done!!
The great thing about this "technique" (if you can really call it that!) is that it's very workable with many many colour combos. I chose to combine Stargazer with Pixie because of Stargazer's blue sheen--and blue and purple are fun together, right?! You could let the glitters help you decide and match colours with blue glitter to other colours with blue glitter, or you could choose two colours with complementary undertones/duochromes.
If the colour you are working with for your outer eye is more of a duochromed colour, the neat thing about using that stiffer angled liner brush for your lower lid is that the undertoned colour will pop out because you use a different amounts of pressure (as opposed to the fluffy brush used in the crease/outer lid). You can see how that works out here:
And again, here:
The great thing about this "technique" (if you can really call it that!) is that it's very workable with many many colour combos. I chose to combine Stargazer with Pixie because of Stargazer's blue sheen--and blue and purple are fun together, right?! You could let the glitters help you decide and match colours with blue glitter to other colours with blue glitter, or you could choose two colours with complementary undertones/duochromes.
If the colour you are working with for your outer eye is more of a duochromed colour, the neat thing about using that stiffer angled liner brush for your lower lid is that the undertoned colour will pop out because you use a different amounts of pressure (as opposed to the fluffy brush used in the crease/outer lid). You can see how that works out here:
(This look uses the same primer, base and brushes as detailed in the above tutorial (as I mentioned earlier). But the inner MSC colour is Love and Rockets while the outer colour is Nana's Tea Party. See how the lower lash colour is bursting with a different quality than the eyelid colour? Yeah, it's magic!!)
And again, here:
(This time I used MSC's XRay Spex on the inner eye and Strange Potion on the outer eye.)
Following the steps of this tutorial your possibilities are seriously endless. Applying both colours over a solid black base would give you a totally different feel, and you could use a two-colour base as well! And as you can see, the addition of liner can certainly add some "BAM!" factor!
I hope you enjoyed reading this tutorial and if you have any questions or want more explanation about a certain step, leave me a comment. :)
Sunday, February 6, 2011
Madd Style Cosmetics: Be My Green (?) Valentine?
Welcome to my somewhat atypical Madd Style Cosmetics Valentine's Day pictutorial! Here you won't find any pink or red pigments being used. But you will find lots of green! Why, green? When my husband and I first met, his favorite colour was green (it has since changed to brown, so I might do a version 2.0 of this with a brown twist). For my Valentine's tutorial I wanted to do a look featuring this wonderful colour. So that's my challenge to you! Do a look in your partner's favorite colour. And if you're parternerless this Feb 14th (because really, it's just another day!), then do a look for yourself with your favorite colour! :)
Keep on reading to find out more about how I achieved this:
Here are the supplies I used to create my look:
Keep on reading to find out more about how I achieved this:
Here are the supplies I used to create my look:
(As always: my SoBe primer and NYX Eyeshadow Base in White. Madd Style Cosmetics pigments (clockwise from white): Tweaker, Oz, Monster Mash, and Ecto Cooler. Mascara. And brushes: eyeshadow brush, large angled brush, domed crease brush, fluffy blender, and pencil brush.)
Next, I took Monster Mash on the same brush and applied it to the rest of my eyelid.
To blend Ecto Cooler with Monster Mash--I decided that I wanted to blend from the inner colour to the outer colour (and not the other way around). And because Monster Mash is such a strong colour, I put a bit more Ecto Cooler on my brush and essentially patted it on to the line between the two colours and a bit towards the Monster Mash.
Now it's time for the crease colour. Using the large angled brush, I dipped it into Oz. Then I traced out where I wanted that colour to go in two steps. I would recommend tracing the first outer angle (pictured in the middle) a little too sharp--you can always dab it below that line to increase the angle. But if you start out with your angle too big, you'll run into issues that involve makeup remover and that kind of fun stuff. Once I was happy with the angle and matched both eyes, I used the tip of the angled brush to trace out the crease and the shape I wanted Oz to take.
Using that same large angled brush I brought Oz down to my lower lashline and took it about half way in. Then, I switched up the brushes to a domed crease brush to fill in the Oz in my outer eye/crease and to blend out that harsh line in my crease up towards the brow. Don't take that too far up though!! Using the same crease brush, I also blended Ecto Cooler up and out towards the Oz in the crease. I didn't want the inner crease to get too too dark.
To finish up the lower lashline, I applied some Ecto Cooler to my regular eyeshadow brush and applied it to the inner half--blending it in with Oz.
And all that's left is highlighting and mascara! Using my fluffy brush, I applied Tweaker under my brow and down into the inner eye. Then, using my little pencil brush, I applied Tweaker to my ducts. Mascara--kind of self-explanatory...but I liked the picture!! :)
And voila!
I hope you enjoyed reading this tutorial and that you'll be inspired to try something similar--whether it be for Valentine's Day or not. Remember--check out Madd Style Cosmetics on Etsy and on Facebook! The Valentine's Collection, "Love and Hate," is going to be released soon and you won't want to miss it, I promise!!
To start out, as usual, you will want to prime your eyelids and apply your chosen base. Today I blended the NYX Eyeshadow base in with my finger instead of using a brush (I'm still trying to figure out the perfect formula of amount of SoBe primer to base in order to get a look that doesn't crease--especially on my right eye!!). As you can see, on the right most photo, my application of the NYX base is quite light--I find that if I apply too much it does encourage creasing, so I keep it pretty minimal. Also--I used a small eyeshadow brush to apply the NYX base it to my lower lashline.
Starting with the ever wonderful, Ecto Cooler, I applied it with my eyeshadow brush to about 1/2 of my eyelid and up past my natural crease to about the height of my eye socket. Remember--pat the colour on. Pat pat pat.
(I apologize for that renegade hair you see by my eyebrow. Trust me, it bothers me too that it's there!! It won't stay for the whole time...)
Next, I took Monster Mash on the same brush and applied it to the rest of my eyelid.
To blend Ecto Cooler with Monster Mash--I decided that I wanted to blend from the inner colour to the outer colour (and not the other way around). And because Monster Mash is such a strong colour, I put a bit more Ecto Cooler on my brush and essentially patted it on to the line between the two colours and a bit towards the Monster Mash.
Now it's time for the crease colour. Using the large angled brush, I dipped it into Oz. Then I traced out where I wanted that colour to go in two steps. I would recommend tracing the first outer angle (pictured in the middle) a little too sharp--you can always dab it below that line to increase the angle. But if you start out with your angle too big, you'll run into issues that involve makeup remover and that kind of fun stuff. Once I was happy with the angle and matched both eyes, I used the tip of the angled brush to trace out the crease and the shape I wanted Oz to take.
Using that same large angled brush I brought Oz down to my lower lashline and took it about half way in. Then, I switched up the brushes to a domed crease brush to fill in the Oz in my outer eye/crease and to blend out that harsh line in my crease up towards the brow. Don't take that too far up though!! Using the same crease brush, I also blended Ecto Cooler up and out towards the Oz in the crease. I didn't want the inner crease to get too too dark.
To finish up the lower lashline, I applied some Ecto Cooler to my regular eyeshadow brush and applied it to the inner half--blending it in with Oz.
And all that's left is highlighting and mascara! Using my fluffy brush, I applied Tweaker under my brow and down into the inner eye. Then, using my little pencil brush, I applied Tweaker to my ducts. Mascara--kind of self-explanatory...but I liked the picture!! :)
And voila!
I hope you enjoyed reading this tutorial and that you'll be inspired to try something similar--whether it be for Valentine's Day or not. Remember--check out Madd Style Cosmetics on Etsy and on Facebook! The Valentine's Collection, "Love and Hate," is going to be released soon and you won't want to miss it, I promise!!
Saturday, February 5, 2011
My (makeup photo) dilemma.
Lighting will forever be my dilemma--especially during the "winter" months when light sources are scarce to begin with. But irregardless of that fact, here is the situation. Under "natural" light I never seem to think that my pigments look as pretty as they do when they're flashed at first.
The evidence:
With Flash (obviously!)
Now. The natural light picture isn't "bad," but I also don't think it shows the pure brightness of the colours as they are in real life. The flash picture probably exaggerates the glitter just a little--but is that a bad thing?! I THINK NOT (but please, don't let my bias overrule your opinion). Hense, my dilemma. I don't want to always post two versions of everything.
Which would you prefer to see? Flash or no flash?
The evidence:
No Flash
With Flash (obviously!)
(Madd Style Cosmetics used! Never Ending Summer on lid. Boognish in crease. She-Bop in deep/outer crease. Janet (from a the Rocky Horror collection that is no longer listed)>She-Bop as lower liner. Ecto Cooler as upper liner. XRay Spex as brow highlight. Applied over SoBe Primed and Proper and NYX Eyeshadow Base in White. UD 24/7 Glide Pencil in Yeyo in waterline.)
Now. The natural light picture isn't "bad," but I also don't think it shows the pure brightness of the colours as they are in real life. The flash picture probably exaggerates the glitter just a little--but is that a bad thing?! I THINK NOT (but please, don't let my bias overrule your opinion). Hense, my dilemma. I don't want to always post two versions of everything.
Which would you prefer to see? Flash or no flash?
Friday, February 4, 2011
New brushes and new mail.
I super duper like to get new brushes. It may be one of my favorite things. Do I need new brushes? No, not exactly!! However, that doesn't stop me. My second most latest purchase (my most recent purchase probably won't make its way to my house for a couple more weeks) was unplanned--and thus I don't feel as guilty about it as I should. Also--the trip the to art supplies store was for another purpose entirely...and that makes it all okay (somehow). AND. Artist brushes are MUCH cheaper than brushes you'll get that are actually "make-up" brushes. So in the end, I WIN.
So. While going to the art store to pick up acrylic paints (my husband and I want to try messing around with them), I found a neato package of brushes that will totally be awesome for liner. And a fan brush--which is so small that it isn't really useful. But 5 out of 6 ain't bad (I think the pack cost $11.99)! The flat topped ones and the angled one are especially exciting to me because their ends are SO very thin. To the left of the pack is a single 000 sized teeny tiny brush (I think it cost...$2 something). I had been doing my eyeliner with a size 00 up to now. The 000 one is awwwwesome though.
I used the 000 to achieve the liner in this look (featuring Madd Style Cosmetics pigments, of course!):
(See how thin the liner is?!! Gah! Awesome. MSC colours used: Blister in the Sun on 2/3rds of the lid. Kick Ass in the outer 1/3rd and then blended into BitS to make that orange colour. The Up in Smoke matte Black was used as my liner. And I used a dab of Rocky (from the Rocky Horror Picture inspired collection) in my duct. Lastly, Xray Spex lightly dusted on as my brow highlight.)
So far I haven't had a chance to play with the brushes from the 6-pack. Hopefully I'll break at least one of them in on Sunday!!
Then, when arriving back home from the art store, I had mail too!! My package from The All Natural Face had arrived! I ordered their primers when I was anxiously awaiting my primer from SoBe--and after a friend recommended the ANF primer, I just had to find out what they were all about. The package contained:
(Liquid Eyeliner, Eyelid primer in "Buff" and in "Black," a business card and two samples)
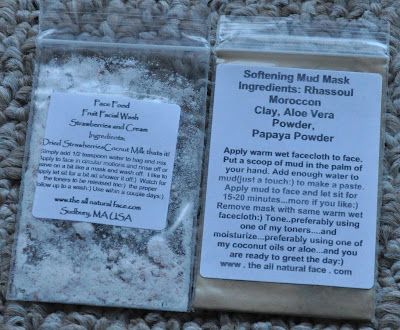
The samples look neat.
(The one on the left is a "Face Food Fruit Facial Wash--Strawberries and Cream" made of strawberries and coconut milk. The one on the right is a "Softening Mud Mask." I rarely do much "fancy" stuff with my facial cleaning routine, but I'll try these out and see what I think!)The primers were what I expected. The texture on them is nice enough, but I definitely experienced creasing after not too long when using them.
The pigmentation on the black one is especially nice. I used it as a base to this look:
(The lower smudged liner was just me testing out the staying power. The top line (right under the scar my sister gave me with a mechanical pencil back when we were younger and hated each other) is the product after two swipes. This colour is called "Black Pearl" but I don't find it to be nearly as pigmented as I want it to be/thought it would be. At least it didn't cost too much $.)
(This is MSC in Jive Talk on the lid. Blended out with some Star Gazer and UiS White as the brow highlight. I also used some UiS Black in my water line overtop of UD 24/7 Glide Pencil in Zero. Putting the loose pigment over the pencil REALLY makes it stick. I mean, really really stick.)
For the picture taking and for about an hour, the lids looked good--but then the creasing set in and I was one sad vegan Canadian make-up obsessed girl.
So all in all, I am not too impressed with the primers I received from The All Natural Face. I am going to try using less and see what happens. Likewise, I was not very happy with the eyeliner. I tried to take a swatch picture:
(The lower smudged liner was just me testing out the staying power. The top line (right under the scar my sister gave me with a mechanical pencil back when we were younger and hated each other) is the product after two swipes. This colour is called "Black Pearl" but I don't find it to be nearly as pigmented as I want it to be/thought it would be. At least it didn't cost too much $.)
Thus concludes my new brushes and mail show-and-tell! I am hoping to work on my next pictutorial on Sunday--so if you're dying to see me try out a specific colour combo--let me know!! :)
Labels:
brushes,
Madd Style Cosmetics,
MSC,
The All Natural Face,
vegan primer
Subscribe to:
Posts (Atom)