The other day, on the Madd Style Cosmetics Facebook Fan Page, one of the girls was talking about Witch's Brew (the green that is part of the "House of Horrors" and I mentioned that I bet the colour would look great with Soylent Green. Both of these greens have gold sparkle to them and thus they're a natural pair! Then I got to thinking that it would be fun to do a tutorial where I use the same colours in the same way (using the same brushes and techniques), but switch up the placement to create two totally different looks.
These two looks were then born!

The following tutorial will be how to achieve the look on the right, but as I'll explain at the end--the look on the left was achieved using almost exactly the same techniques, but switching up the placement of the lid colours. Hopefully by the end of this tutorial you'll understand that the same colours and same techniques can get you daytime or nighttime looks, it's all just a matter of placement!
To begin, collect all of your supplies!
 (Top to bottom, left to right: Gabriel Color Mascara in "Black"; Urban Decay 24/7 Glide-on pencils in "Yeyo" (white) and "Zero" (black); NYX Eyeshadow Base in "White"; Too Faced Shadow Insrance; Madd Style Cosmetics Pigments: Witch's Brew, Soylent Green, Silver Haze and Birfday Suit; Bdellium tools brushes: #777 (Shadow), #781 (Crease) , #769 (Angled Contour) and # 716 (Smoky Eyeliner).)
As always, start with a clean eye!


Then you're going to prime your lid and apply a base for your Madd Style Cosmetics pigments. I put a small amount of Too Faced Shadow Insurance on a ring finger, rub it together with my other ring finger, and apply this all over my lid (up to the brow), down in the duct area and along my lower lash line. Wait a few seconds for this to set, then apply the NYX Eyeshadow Base in an even (thin) layer to your eyelid--blend it out slightly into the crease area. Put a bit of the product into the duct area, as well. Lastly, apply the Urban Decay pencil on the outer half of the lower lash line.

This is what you'll have:
 (Try to keep the white pencil off of your lashes, if you can!! I never can seem to!)

This is what you'll have:
 (Try to keep the white pencil off of your lashes, if you can!! I never can seem to!)
To begin, grab a shadow brush. Dip it into Witch's Brew (a very neat dark green with gold shimmer/glitter) and pat this colour on to the whole lid area. You'll definitely want to be careful to pat pat pat this colour on as any kind of "swiping" motion will lead to sever gold glitter loss! Using some Awesome Sauce on the lid would also help to get the glitter to stick, so if you have some Awesome Sauce, I'd suggest using it as well (after your base is applied, smooth a VERY thin layer of Awesome Sauce over your lid and wait a minute or two for it to dry)!

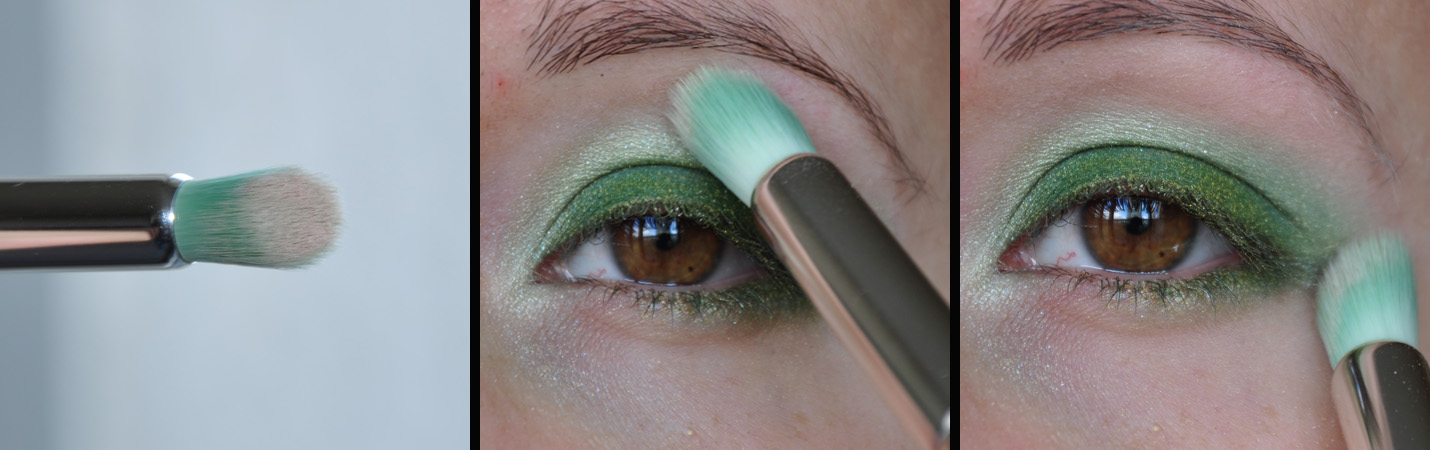
Switching to a pointed crease brush, dip it into Soylent Green (a gorgeous minty green with gold shimmer) and apply this to the crease. Starting at the outside corner of your lid, apply it all the way around the edge of Witch's Brew.

What you'll have at this point is something like this:

To blend these two colours together, you're going to use the same brushes you just used to apply them, but layer them over the "seam" of where the two colours meet. Start with Witch's Brew--dab it higher up into the crease to start blending it into Soylent Green.
 (Be careful not to end up with a "bald" spot--like I have in the center of my lid! Awesome Sauce would have helped with this, I promise!)
Using that same pointed crease brush, go back into Soylent Green. Apply this over the Witch's Brew you just applied into the crease area.

If you do end up with a bald spot--don't worry! Just go back into Witch's Brew and dab it over that bald spot! :)

For the lower lash line, apply some Witch's Brew to a pencil brush or smoky eyeliner brush. Pat this colour over the Urban Decay pencil. Taper it toward the middle of your lower lash line so it's a bit thicker on the outside of the lash line and gets thinner toward the middle. Make sure to "connect" it to the Witch's Brew at the outside corner of your eyelid.

Flick any remaining Witch's Brew off your brush and then dip it into Silver Haze (a light silvery jade colour with yellow undertones). Apply this colour to your duct area and slightly "blend" it upward to meet up with the Soylent Green in the inner crease.

At this point, you'll have something like this:

For the brow highlight, take an angled contour brush and dip it into Birfday Suit (or any matte shadow that matches your skintone). Apple this under your brow and blend it down toward the Soylent Green. I also like to take the colour out to the outer corner to help shape and blend out the colours at that outer edge.

Since Witch's Brew is such a strong and darker colour, I decided to line my waterline with a black pencil. You don't have to do this, if you don't want to! I think it helps pull the look together. I also applied the pencil to the outer half of my upper waterline. By only applying it to the other half, I find that helps to widen my eyes and also to darken those outer lashes--which helps to wide the eyes. To get the pencil to "stick" to your waterline, you can set it by using an angled brush and patting a matte black shadow over top of it.

Curl your lashes and apply a black mascara.
 (Yep! I have the new Urban Decay lash curler, I love it!)

If you do end up with a bald spot--don't worry! Just go back into Witch's Brew and dab it over that bald spot! :)

For the lower lash line, apply some Witch's Brew to a pencil brush or smoky eyeliner brush. Pat this colour over the Urban Decay pencil. Taper it toward the middle of your lower lash line so it's a bit thicker on the outside of the lash line and gets thinner toward the middle. Make sure to "connect" it to the Witch's Brew at the outside corner of your eyelid.

Flick any remaining Witch's Brew off your brush and then dip it into Silver Haze (a light silvery jade colour with yellow undertones). Apply this colour to your duct area and slightly "blend" it upward to meet up with the Soylent Green in the inner crease.

At this point, you'll have something like this:

For the brow highlight, take an angled contour brush and dip it into Birfday Suit (or any matte shadow that matches your skintone). Apple this under your brow and blend it down toward the Soylent Green. I also like to take the colour out to the outer corner to help shape and blend out the colours at that outer edge.
Since Witch's Brew is such a strong and darker colour, I decided to line my waterline with a black pencil. You don't have to do this, if you don't want to! I think it helps pull the look together. I also applied the pencil to the outer half of my upper waterline. By only applying it to the other half, I find that helps to widen my eyes and also to darken those outer lashes--which helps to wide the eyes. To get the pencil to "stick" to your waterline, you can set it by using an angled brush and patting a matte black shadow over top of it.

Curl your lashes and apply a black mascara.
 (Yep! I have the new Urban Decay lash curler, I love it!)
Here's the final look!

And *then* this is what it looks like with the lid colours (Witch's Brew and Soylent Green) reversed!
 (The only thing I did differently for this look is that when I applied Witch's Brew into the crease--I angled it out a bit to create a soft "triangle" at the outer part of my lid (I kept the crease colour more "rounded" in the darker version of this look). I also applied "Yeyo" (a shimmery white) to my waterline. Otherwise everything else is exactly the same!!)
I hope you all enjoyed this tutorial! I think I might do something similar to this in future tutorials, if you all find it helpful. :)
LOVE THIS ♥
ReplyDeleteThanks!! :)
ReplyDeleteThis is really beautiful! It makes me want to wear Witch's Brew today!
ReplyDeleteThis is really beautiful! It makes me want to wear Witch's Brew today!
ReplyDeleteThanks, Beth! Witch's Brew is a fantastic colour. You will *love* it!!
ReplyDelete