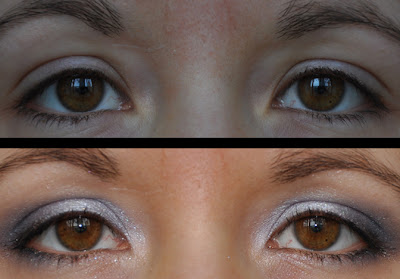
The supplies you will need to accomplish this:
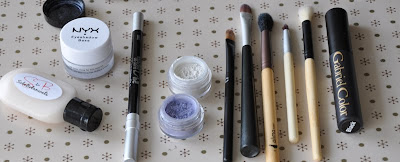 (Left to right: SoBe's Primed and Proper, NYX Eyeshadow Base in White, Urban Decay's 24/7 Glide-on Eye Pencil in Zero (black), MSC's Columbia (or any white MSC pigment you have), Illuminati (the start of the show!), a concealer brush/small stiff eyeshadow brush, a flat eyeshadow brush, a fluffy blending brush, a pencil brush/extra small eyeshadow brush, an extra fluffy brush, and mascara!)
First you will want to prime your lids. You can use any kind of eyelid primer you want to, my product of choice right now is SoBe's Primed and Proper. I put a TINY amount on to an index finger, then I rub my two index fingers together and apply the product to both of my eyelids--all the way from the lid to the brow, to the inner eye/duct area and on my lower lash line.
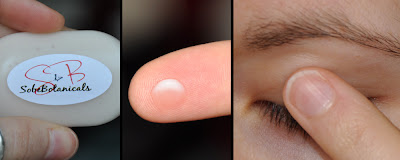

Next comes the white base. Using a small eyeshadow brush, I apply it in my ducts and on the inner 2/3rds of my eyelid. You can cover your whole eyelid with the white and then put the black over-top of the white--but why waste your precious white base if you don't have to?! If you have a different kind of white base, don't fret--any white base will do!
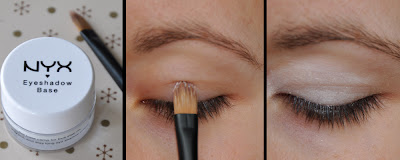
For the black base you want to take your eye pencil (or your black base of choice) and starting at the outer corner of your eyelid, fill in where your left off with the white. I also filled in the outer lower lash-line--about the outer 1/3rd.
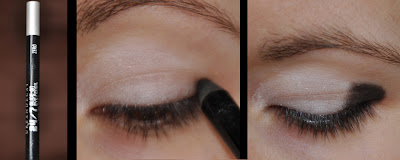
Then you gotta get a little blendy! I use my finger--especially because the UD Pencils are quite firm and I don't think any of my brushes would be strong enough to move the product. I blended the black in towards the white on the lid and also up towards my outer crease and a bit towards the middle crease.
 (As you can see in this picture--I got a little overzealous with my blendy blendyness. I think I applied a bit more of the NYX eyeshadow base to the lid to fix that.)
Now your lids are primed and your two-toned base is ready for whichever MSC pigment you want to feature. I tend to like to pick lighter colours when I do my white>black base in this style. I will do another pictutorial in the future showing a different variation on this and what effect you get by changing the placement of the white and black bases.
Dip your brush into your pigment and swirl it around on the inside of the lid to get the product evenly distributed through your bristles. Using this brush I applied Illuminati to the inner 2/3rd of my eyelid. Remember. PAT. Pat pat pat the pigment on.
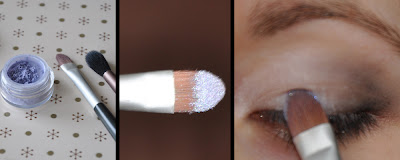
Once you're finish with the patting, it should look something like this:
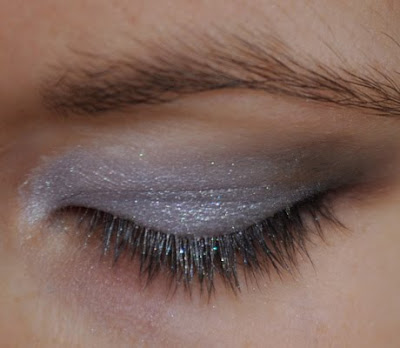
Notice that I stayed away from the black? That was definitely on purpose. When I do one-colour-looks, I like to use different brushes in order to help give the single pigment even more dimension.
To do my crease colour I use a fluffy brush--this really brought out the glitter in Illuminati. I started with my fluffy brush in the outer corner of my eye and then rocked the pigment up in into the crease all the way into my inner eye (not the duct area though!). Using the same brush I also brought the pigment down on my lower lash-line.
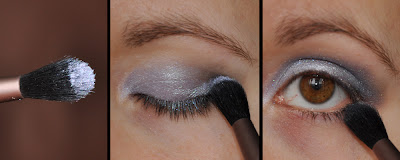
You could very well end the look here and be done! But I figured adding a duct highlight/brow highlight wouldn't be cheating. Using Columbia (from MSC's Rocky Horror Picture inspired collection) I highlighted my ducts with the tiny eyeshadow brush and my brow area with my fluffy fluffy blender brush.

Apply some mascara (as always-I use Gabriel's mascara in "Black"), and we're done!
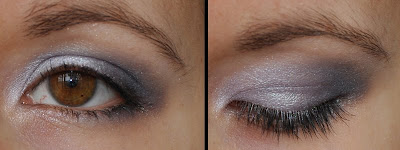
I hope you found this tutorial helpful and that you feel like you're ready to try it on your own! If you have any questions or need further details on steps, leave me a comment. :)

For the black base you want to take your eye pencil (or your black base of choice) and starting at the outer corner of your eyelid, fill in where your left off with the white. I also filled in the outer lower lash-line--about the outer 1/3rd.

Then you gotta get a little blendy! I use my finger--especially because the UD Pencils are quite firm and I don't think any of my brushes would be strong enough to move the product. I blended the black in towards the white on the lid and also up towards my outer crease and a bit towards the middle crease.
 (As you can see in this picture--I got a little overzealous with my blendy blendyness. I think I applied a bit more of the NYX eyeshadow base to the lid to fix that.)
Now your lids are primed and your two-toned base is ready for whichever MSC pigment you want to feature. I tend to like to pick lighter colours when I do my white>black base in this style. I will do another pictutorial in the future showing a different variation on this and what effect you get by changing the placement of the white and black bases.
Dip your brush into your pigment and swirl it around on the inside of the lid to get the product evenly distributed through your bristles. Using this brush I applied Illuminati to the inner 2/3rd of my eyelid. Remember. PAT. Pat pat pat the pigment on.

Once you're finish with the patting, it should look something like this:

Notice that I stayed away from the black? That was definitely on purpose. When I do one-colour-looks, I like to use different brushes in order to help give the single pigment even more dimension.
To do my crease colour I use a fluffy brush--this really brought out the glitter in Illuminati. I started with my fluffy brush in the outer corner of my eye and then rocked the pigment up in into the crease all the way into my inner eye (not the duct area though!). Using the same brush I also brought the pigment down on my lower lash-line.

You could very well end the look here and be done! But I figured adding a duct highlight/brow highlight wouldn't be cheating. Using Columbia (from MSC's Rocky Horror Picture inspired collection) I highlighted my ducts with the tiny eyeshadow brush and my brow area with my fluffy fluffy blender brush.

Apply some mascara (as always-I use Gabriel's mascara in "Black"), and we're done!

I hope you found this tutorial helpful and that you feel like you're ready to try it on your own! If you have any questions or need further details on steps, leave me a comment. :)
I love single pigment looks!! Very nice tutorial!
ReplyDeleteGRRR!!! I love this look! I'll have to try this <3
ReplyDeleteThanks Taylor!
ReplyDeleteAnd yes, Karen! Try it!! :)
This looks nice, very easy! Thanks for the tut! :D
ReplyDelete