Pages

Friday, May 6, 2011

Madd Style Cosmetics: An in depth look at pre-MSC preparation

There are two main reasons for this post. First, I've seen some people posting on the Madd Style Cosmetics FB Fanpage with some questions about primers and bases and why they're important and are they really necessary, that kind of stuff. This post will serve to talk about my current favorite way to prepare my eyelids before laying on the Madd Style. Second, I thought I'd be nice to have a post I could refer back to in my future tutorials when I use the same primer/base method (this is the method I seem to be using about 75% of the time)--that way I don't have to photograph it each time and re-explain it each time. Yay for time savers!!

For those of you who have been following me for a while, you know that I ran into a bit of an issue with finding a reliable vegan primer after I discovered that Urban Decay's Primer Potion had been suddenly labeled as non-vegan. I was excited when I received my Sobe Botanicals Primed and Proper primer...and even though it didn't work out so well for me at first, I thought I had managed to come up a reliable way to make it work for me after some trial and error. But truth be told, I have not been able to properly duplicate that success I had with SoBe's product and so my go-to-primer has been the one I received from The All Natural Face (my first package chronicled here).

Thus begins our priming and basing journey!

Primers are extremely important when it comes to mineral pigments. Primers, if they work correctly, help to keep your pigments in their place. There is nothing more sad (in the makeup world) than a pretty look that is only pretty for the first 30 minutes and then it begins to travel into the crease of your eyelid. Primers combat this problem and they also help your colours appear more vibrantly since they make the pigment "stick" to your eyelids. Another bonus is that some primers help to disguise any veins or discolouration you might have on your eyelids--if your primer is more clear, this won't be so, but for my favorite primer it almost doubles as a kind of concealer. As I have said, my favorite primer this moment is the All Natural Face Eyeshadow Primer in "Buff". The selling feature of this stuff is that it's good for "oily" lids. Now, I'm not exactly sure if my lids are what one would call "oily"--but it seems to do what it's suppose to. My primer now looks something like this.

Yeah, it's not the best packaging--as you can see there are some specks of particles stuck to the product. But the fact that this is the primer that works best for me at the moment lets me overlook my distaste for the packaging.

To apply this product, I rub my finger (sometimes my ring finger if I'm thinking clearly--since your ring finger won't allow you to use a much pressure as your index finger (for example) so it's a more delicate touch for your equally delicate eyelids) on the top of the product until I have about this much:


Then I pat it on to the center of my eyelid, like this:


Once it's there, I just blend it out to the rest of my lid, up to my brow bone, down around the inner part of my eye and if I have enough product left--I also run some along my lower lash line. When it's all blended out, it looks a bit like this:


With the primer all blended out, this *could* potentially be your last step before starting to apply your Madd Style Pigments. If you're going for a more toned down look, putting your pigments straight on to primer is a totally fine thing to do. I like my colours to be very vibrant and opaque and to achieve this most successfully, I use a base after the primer and before applying any pigments to my lid. A base is something that can come in different colours--a black base will help deepen/darken the look of the pigment you put on top of it. A purple base under a purple pigment can help intensify that purple-ness! A base that has sparkle or pearl can add a pearlyness to a pigment that would otherwise not be quite so pearly! Typically I just use a pure white base as a white base gives a nice bright even background for the pigments and helps them to become even brighter themselves. It's like magic, people! Very similar to the set up of my primer, my chosen base is NYX's Eyeshadow Base in white. The other benefit of applying a base is that its stickiness will help you to avoid fallout (pigment or glitter falling on to your cheeks!). Bases do all KINDS of good things!


Similarly to the issue I have with the pot of primer (as you can see) my NYX base likes to collect little specks of stuff. Not a big deal. It still works! And my method for application is identical to what I do with my primer. I rub my finger on the top.


And then I apply it to the center of my eyelid. You want to be careful not to apply too much base. If you layer on too much it can cause creasing--and as I said, creasing is bad. You want to avoid that. :)


Lastly I blend it out to the rest of the lid, up to my crease/brow bone, into the inner part of my eye, and down on my lower lash line.

And voila! Now you have a primed and based eyelid!


Therein lays the in depth look at/explanation of my pre-Madd Style preparation. I hope you've found it helpful and if you have any questions, let me know!

Thursday, May 5, 2011

Pure Fusion Review & First Impressions

I have been admiring the colours on Pure Fusion's etsy page for quite some time now. My admiration was two fold: 1) pretty colours always catch my eye & 2) that they're located in Terrace B.C. was awesome to me since I was born in Smithers! Since ordering mineral makeup on Etsy I have never found a Canadian vendor and I was tickled pink to find a company that looked like they had awesome colours and were even in the same province as me. Since I like to buy local produce, I figured trying out some local(ish) makeup would be a fantastic idea! The other bonus: NO CUSTOMS between me and this package!!! Wonderousness.

Last Friday I finally placed my first order for 10 samples. Pure Fusion offered a 10 samples for $10 with free shipping and I figured this would give me a chance to try out several colours that caught my eye without having to spend too much--and the sample sizes were big enough that I knew I'd get multiple uses out of each colour, so it was all good for me on that front. Today, Thursday, I was pleasantly surprised to open my mailbox and find my Pure Fusion order. That's only 6 Big Sleeps since I placed my order! My happiness did not end there.

It's clear to me that Pure Fusion takes its business very seriously and this is evident in the packaging of their products.

Inside a bright yellow envelope I was pleased to find this rather adorable envelope.

(All pictures can be enlarged by clicking on them.)

And upon opening the envelope, I was even more impressed. Usually samples are just tossed into an envelope--but my samples had been thoughtfully arranged in a rainbow pattern!! Fantastic!! The baggies were all professionally labeled with the name of the pigment and the Etsy link of the shop--which is great because sometimes you end up forgetting where you got what when you just have a bunch of baggies with names and nothing else on them!


At first I had assumed that the sample bags were just stapled on to the paper card stock, but no! Double sided tape!! Am I silly for thinking that's genious? I am very pleased with the amount of thought that went into packaging up my 10 little samples. :)


The main yellow envelope also contained two cards:

1) I like that a little instruction manual (of sorts) comes with the colours. Although I am familiar with making mineral pigments/eyeshadows into eyeliners and I'm aware of how to foil--I appreciate that Pure Fusion takes the time to let their customers (who might not already know) how to best use their products.


2) The second card is a general business card with the contact information for the company and a nice handwritten thank you on the back. A nice touch, I think.


And because I'm the WORST swatch picture taker EVER, I did not swatch my ten received samples. But I did immediately dip into 6 of them to make these two quick looks. Both looks were applied over the All Natural Face Shadow Primer in "Buff" and NYX Eyeshadow Base in "White".

Neith (a soft rosy brown) applied to the first 1/2 of the lid, Aphrodite (a smoky purple) applied to the rest of the lid, and Enchanted (an intense rich purple) applied on the outer lid and into the crease.

Lemon (a sheerish coveraged yellow) applied to the first 1/3rd of the lid, Chartreuse (a yellow/green) on the middle 1/3rd of the lid, and Borghild -not currently listed on the Etsy page- (a nice lightish blue) on the rest of the lid.

These pigments were quite nice to work with. I experienced quite a bit of fallout (which is unusual for me), but I think part of this is because I'm no longer used to dipping my brushes into baggies and perhaps I didn't pack the colour into my bristles like I can when the pigments are in jars. The colours were very blendable and were glittery without being too BAM! GLITTERY! (which is nice!). I ordered four other colours that I did not demonstrate in the two looks: Syn, Mermaid, Laga and Persephone. I am super excited for those four colours and when I do use them, I'll be sure to post a few more pictures.


As far as ordering was concerned--the process was painless, but I do wish the Pure Fusion Etsy site listed their mineral shadows by colour group instead of lumping them all together--it makes it kind of annoying to go through four pages to look for one colour. But that is only a minor annoyance.

Will I order full sizes of some of the colours I received? Probably. Chartreuse was quite wonderful and I also really liked Enchanted. The full sizes come in 5 gram jars (with sifters) and sell for $5 a pop--that's reasonable, although I cannot speak to how packed the jars from Pure Fusion are. $5 is typical, at least.

Overall I am very pleased with my experience!

Thursday, April 28, 2011

50!!

Oooooh goshes! Today I reached 50 subscribers!! :)

Thank you, each and every one of you, for following me on this crazy thing called a blog.

I have plans to put together a give away package soon--it will be 100% vegan (of course), but I have to gather all of the items together. Maybe I'll even be at 100 subscribers before I get it all ready!

To indulge let you all a bit into what I was up to today:


Yes, the baby geese have arrived! It was a good day.

Edit! Oh, and perhaps I should ask: if you were going to win a vegan makeup-ey type prize, what kind of items would you hope for?! Let me know in the comments!

Tuesday, April 26, 2011

Madd Style Cosmetics: Candy Inspired!

Fellow Madd (Style Cosmetics) Model Beth Br00tality had an (awesome) idea that we all do looks inspired by....candy (!) this week. We all hopped on the candy train and chose our own candies to inspire us and our looks. I knew that I wanted to choose a vegan candy--even though back when I ate candy, I wasn't vegan (I've been vegan for just over 6 years and haven't have smidgen of candy in over 10)--and one of my favorites from when I was a kid were Maynard's Fuzzy Peaches! I especially liked this picture of them and used it for my inspiration...but that picture is copy written (as it should be! It's awesome!), so if you're link phobic (and for some reason don't know the glouriousness that are Fuzzy Peaches), they essentially look like this:


I wanted to use the same colours and the rounded shape of the colours in the Fuzzy Peaches in my Madd Style Cosmetics look. And this is what I came up with:

(No flash! Click on pictures for larger versions, as always!)

To find out more about how I achieved this look, please keep on reading. :)

To begin, the supplies you will need are as follows:

(NYX Eyeshadow Base in "White"; The All Natural Face Shadow Primer in "Buff"; Gabriel Color Mascara in "Black"; Madd Style Cosmetics piggies in (top row) Strange Potion, Princess Buttahcup, Xray Spex, (bottom row) Peep Show, Boognish (*now discontinued*) and Dazzle Dust; a pointed crease brush; a small eyeshadow brush; a fluffy crease/blending brush.)

Start with a squeaky clean eye and begin by priming and then applying a base. In this first photo I have applied the All Natural Face primer to the center of my lid--I then blended it out with my finger to the entire lid. In the middle picture you see the NYX Eyeshadow Base applied and in the last picture it is blended out on the entire lid.


Grab some Strange Potion (an awesome duochromed pinkish orangeish colour) on a pointed crease brush (swirl the brush around in the inside of the lid to get the colour evenly dispersed amongst the bristles). Apply this colour to the inner eye up into the inner crease.


Then, using the same brush and the same piggie, apply it to the outer corner and up to the crease. In the middle picture you see the inner with the outer. And in the third picture, you can see that I joined the two colours in the crease but left the majority of the center of the lid "empty".


Again, with the same brush and the same pigment, take a bit of colour on to the inner and outer parts of the lower lash line.


Changing your brush, grab a small eyeshadow brush and dip it into Peep Show (a bright coral with *gold* sparkle!). Carefully apply this to the center of your lid--filling in that whole space that was left "empty". I gently blended the edges of Peep Show out into Strange Potion at this step as well.


Using that same eyeshadow brush, grab a bit of Boognish to apple to the "empty" center part of your lower lash line.


With a fluffy blending/crease brush, dip it into Princess Buttahcup (a pale and shimmery yellow) and apply it above the Strange Potion--starting at the outside corner and working your way in toward the inner part of the crease.


Then, using that same fluffy blending brush, dip it into XRay Spex (a lovely neutral colour with pink glitzy duochrome) and dust that below your brow and above the Princess Buttahcup. And using that same pointed crease brush, apply a bit of the XRay Spex to your tear duct area.


To get that "sugar" coated look, I took that same fluffy blending brush and dipped it into the ultra glitzy Dazzle Dust. All you need to do here is "pat" it all over your lid and a bit into the crease. To get the sparkle to stick, you could apply some kind of glitter adhesive to your lids (or maybe the brush?) first--but I find that Dazzle Dust is fine enough that it basically sticks around for as long as it should without messing around with it too much!


Apply some mascara and that's it! I found that my finished look didn't have quite enough "orange" in it, so I applied a bit more of the Boognish to my pointed crease brush and applied it to the outer part of my lid (on top of where the outer portion of Strange Potion used to be).

(No flash)

(With flash!)

I think my look could have had even more orange and yellow to it--but I liked the way the "rounded" Peep Show on the lid mirrored the very round shape of the pinkish/reddish colour in the Fuzzy Peaches.

I hope you liked this little tutorial and that if nothing else--you've been inspired to go find some Fuzzy Peaches to eat while browsing the plethora of awesome colours that are offered by none-other-than Madd Style Cosmetics!

Monday, April 25, 2011

EOTD: Madd Style Cosmetics "Reverse Watermelon-ey"

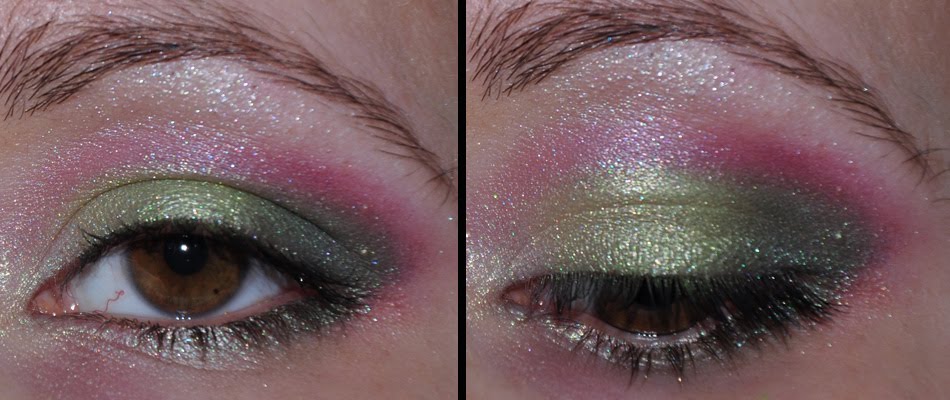
It's been a grey couple of days so I wanted to do something un-cloudy to cheer myself up. :) What I ended up with is sort of a reverse watermelon (or at least that is how I've been thinking about it!). Green on the lid with a pinkish color in the crease. Lots of fun and very not cloudy!!

(No flash)

(With flash)

Products used:
  • SoBe Primed and Proper primer
  • NYX Eyeshadow Base in "White"
  • Madd Style Cosmetics 3rd Wish (from the Sham ROCK collection) on the inner eye
  • Madd Style Cosmetics Ecto Cooler on 1st 2/3rds of lid
  • Madd Style Cosmetics "Emerald" (from the Dark Crystal collection) on the outer 1/3rd of the lid and on the lower lash line
  • Madd Style Cosmetics Young Blood in outer crease (and outer eye)
  • Madd Style Cosmetics Janet (from the Rocky Horror Picture Show inspired collection) on the inner crease
  • Madd Style Cosmetics "White" (from the Up in Smoke collection) as the brow highlight
  • Gabriel Color Mascara in "Black"
And that's it! (Well, that was kind of a lot of colours, but still!)

Monday, April 18, 2011

Madd Style Cosmetics: Oz is Down the Hidden Track

Hi! *waves*

The other day I wanted to try pairing Madd Style Cosmetics's Hidden Track (described as a mustard brown color with a murky green duochrome) with Oz (a jewel toned emerald with multicolored shimmer and yellow glitter) to see what would come of it. I had previously done a tutorial combining Hidden Track with a yellow, but this time I wanted to pull on that green duochrome in it and pair it with a green. I quite liked the combination!

So, if you want to find out how I achieved this look:

(This was taken without a flash.)
(All pictures can be clicked for larger versions.)


Then please keep on reading.

To begin, gather all of your supplies!

(Gabriel Color mascara in "Black"; NYX Eyeshadow Base in "White"; The All Natural Face Shadow Primer in "Buff"; Madd Style Cosmetics piggies in: 3rd Wish (from the Sham ROCK collection), Hidden Track, Oz and Tweaker; eye shadow brush; fluffy crease brush; smudger brush; pointed/domed crease brush; fluffy fluffy blending brush.)

As always, start with a clean eye and apply your chosen primer and then a base. Using my finger, I applied the All Natural Face primer to the center of my lid and then blended it out. Next, using the same method, I applied the NYX Eyeshadow Base on top of the primer and blended it out.

(I have some dry skin, as you can see, at my lash line. Not good, but I didn't know it was happening until I put the primer on!)

Taking 3rd Wish (available in this amazing collection!) on an eyeshadow brush, I applied it to my tear duct and into the first 1/3rd (or so) of my lid. Remember, as with all Madd Style's piggies, you want to "pat" these on to your eyelid. Avoid "swiping" as much as possible!! You'll lose the pretty glitter if you do that. With colours like 3rd Wish and Hidden Track, however, they're more so "shimmery" colours and thus can be swiped on, if you so choose. But I'm in favor of you all getting into the (good) habit of just always patting on your piggies!


Next, taking Hidden Track on the same brush, I applied it to the rest of my lid.


To blend these two together a bit better, I put a bit more Hidden Track on my brush and lightly patted it where you see the line between the two colours.


Now you're ready for your crease colour. I switched to a fluffy crease brush and got some Oz on to it (dip your brush into the pigment and then "swirl" the brush around on the inside of the lid to get the colour evenly distributed throughout the bristles) and apply it to the outer eye and pull the colour up into the crease towards your inner eye (follow the crease though, don't bring this dark colour in down towards your tear ducts or anything like that! And don't bring it in all the way into the inner part of your eye--that'll get a bit too dark and will make your eyes appear smaller than they really are).


At this point, we have something like this. Notice how the Oz is just kinda sitting there on the outside looking kind of awkward and unblended with Hidden Track? Don't worry, we're going to fix that!


Take that same fluffy crease brush and apply a bit more Oz to it. Then, put the brush on your outer eye and gently apply the colour to the outer-most part of your lid. Gently blend it with Hidden Track and you'll end up in a much better (and prettier!) situation.


For the lower lash line, take a smudger type brush and dip it into Oz. Then apply this to your lower lash line, but only bring it in about 1/2ish way from the outer corner.


When I got to this point, I decided the shape of Oz wasn't quite what I wanted. So, I used my magic...finger (!!) to clean up the edges and "erase" some of the Oz that went out too far in the outer corner. By the end of this, I had a more "rounded" shape.


Now, you'll notice that Oz (in the inner eye) is kinda just floating around and isn't blended in very well. To solve that, take 3rd Wish again, but this time on a pointed/domed crease brush and apply it from the ducts up towards Oz.


Lastly, for the highlight--I used Tweaker on a fluffy fluffy brush and lightly applied it on the brow bone while also blending it down towards Oz to make that shift between Oz and Tweaker a bit more soft.


All that's left is mascara and it's finished!

(With flash)

(Without flash)

I think the golden tones in 3rd Wish played nicely with the golden qualities of Hidden Track. And Oz also has a bit of goldeness to it (because of the yellow glitter)--so all three colours jived together quite well (at least I thought so!). I hope you enjoyed the tutorial! If you have any questions or want further details about one of the steps, let me know. :)

Annnnd, if you have any Madd Style Cosmetics piggies that you'd love to see used in a future tutorial, just let me know in the comments and I will try to work your request into my next pictutorial.

Monday, April 11, 2011

EOTD: BeautyJunkee duplicate.

Yesterday I watched BeautyJunkee's Sunburst Eyes tutorial. Then when I was getting ready to go see Harry Potter (Pt 1)** and I decided to dupe it, since I thought it was so very pretty. I put my own twist on things (read: I made it vegan and glittery!) since I don't own any of the products that BeautyJunkee used. In her look she uses matte shadows only and I decided to glitter up my version just a bit (I don't actually own any matte reds or oranges, so I was strapped for options, really!). I also didn't have time to do a winged liner, so my liner is just basic.

**Harry Potter was NOT good. Granted, I have never read the books, but this was the first of the movies that I felt I could not follow without having read the books. I am sad I wasted 2.5 hours of my life in the theater!!

So this is what I did:


Products used:
  • The All Natural Face Primer in "Buff"
  • NYX Eyeshadow Base in "White"
  • Sugarpill Cosmetics "Buttercupcake" on first 1/2 of lid--I also applied this all along the lower lashline.
  • Madd Style Cosmetics "Ruby" (from the Dark Crystal collection) in outer 1/2 of lid and blended towards Buttercupcake--I also applied this in the outer 1/3rd of my lower lash line and blended it towards the Buttercupcake.
  • Madd Style Cosmetics "Boognish" in crease
  • Madd Style Cosmetics "White" from the Up in Smoke collection in the ducts and as brow highlight
  • Urban Decay's Ink for Eyes in "Black" as liner
  • Urban Decay's 24/7 Easy Glide pencil in "Yeyo" in the waterline
  • Gabriel Color mascara in "Black"
And there you have it!

Check out BeautyJunkee on youtube--her videos are great. And as always--check out Madd Style Cosmetics (if you haven't already!). Mo just released a bunch of new colours and they're all freakin' AMAZING.